Deploying FileFlex Enterprise High Availability Cluster on Virtual Machines(VM)
- Components of FileFlex Enterprise Platform
- Introduction
- Scope
- Planning & Requirements
- Note on Installation Steps
- Installing High Availability cluster on AWS
- STEP: Verify and Enable DNS Attributes
- STEP: Create IPs
- STEP: Create Security Group
- STEP: Spool up VM instances
- STEP: Assign Elastic IPs to Instances
- STEP: Copy the private IPs
- STEP: Create Hosted Zones
- STEP: Create PTR Record (reverse zones) Per Instance
- STEP: Create Forward Zones per Instance
- STEP: Setup External Domain DNS
- STEP: Start installing Primary FileFlex Server
- STEP: Start installing Secondary FileFlex Server
- STEP: Start configuring the FileFlex Server Cluster
1. Components of FileFlex Enterprise Platform
FileFlex enterprise platform consists of 3 main components.
- The FileFlex enterprise server
- The FileFlex data connector agent
- The FileFlex end-user application
2. Introduction
FileFlex enterprise server can be deployed as a cluster with a minimum requirement of 4 virtual machines. This allows companies with a high volume of users accessing the system to plan and deploy a highly available FileFlex solution.
3. Scope
The scope of this document is to make the enterprise server component of the platform highly available.
4. Planning & Requirements
The deployment of the cluster requires some preparation work. Listed below are some of the key requirements; actual provisioning of these required items will happen in sequence during the cluster deployment.
- Domain Name setup for 4 VMs
- Example:
- VM#1 = fileflex.example.com
- This is the Main/Primary Domain used by users to access your FileFlex Enterprise
- Example: Secondary Domains servicing the users traffic
- VM#2 = ff2.example.com
- VM#3 = ff3.example.com
- VM#4 = ff4.example.com
- Example:
- External/Public IP Addresses = 4 (One per VM)
- Wild Card SSL Certificate (this can be bought from within the server installation once the primary machine is setup)
5. Note on Installation Steps
Once you have the domain names planned you can go ahead with the next installation steps.
We will follow a logical sequence of steps but based on Cloud Service Providers (CSPs) like Azure, AWS Google Cloud etc. the Steps Sequence will have additional steps in their relevant sections.
- Provision IPs
- Provision VMs
- Setup DNS
NOTE
This manual assumes that you are familiar with FileFlex single VM installation steps.
If not please review the single server installation steps to understand the basic requirements.
You can download the FileFlex Server Installation Guide here: https://enport.fileflex.com/installing-enterprise-server/?platform=Other
6. Installing High Availability cluster on AWS
Login to AWS Portal at https://console.aws.amazon.com/
6.1. STEP: Verify and Enable DNS Attributes
- Login to https://console.aws.amazon.com/vpc/
- Navigate to "Your VPCs" from the left menu
- You may use your existing VPC or provision a separate one for the purpose
- Verify that DNS resolution and DNS hostnames attributes of the virtual private cloud (VPC) must be enabled as explained here

6.2. STEP: Create IPs
Create 4 (FOUR) separate Elastic IPs ("Network & Security" -> "Elastic IPs" -> "Allocate Elastic IP address")


6.3. STEP: Create Security Group
Navigate to "Security Groups" -> "Create security group"
- Allow the following "Custom TCP" ports for "inbound rules": 4007, 4010, 4011, 9443, 443, 22, 80, 61616, 27017, 7443 from "Anywhere"
- Allow the "All TCP" Type to "Anywhere" for outbound and associate it with your VPC:
- Save with "Create security group"
Module | External Ports | Internal Ports |
|---|---|---|
serveradmin | 22,9443 | |
webserver | 22,80,443 | 7443 |
adapter | 22,80,443,4010,4011 | 7443 |
mongodb | 22 | 27017 |
activemq | 22 | 61616 |
pki | 22,4007 |

6.4. STEP: Spool up VM instances
Create a VM from the latest image ("AMIs" -> "Images").
6.4.1. Find the FileFlex image
If you followed STEP 6.1 to link AWS id in FileFlex Enterprise Partner Portal then you will find the FileFlex image by selecting Private Images in the filter


In order to start the process, select the image and click "Launch"
6.4.2. Deploy the VM
Choose an instance type with at least 4GiB of Memory with 2 cores this is the baseline:


6.4.3. Choose the number of instances
Type in 4 to provision the number of instances we need.

Click all the way to the Configure Security Group
6.4.4. Assign security group
Navigate to the "6. Configure Security Group" tab,

- Click on "Select an existing security group" from "Assign a security group" and
- Click on the security group you've previously created to select it
- Click "Review and Launch" to proceed with the review
- Verify that everything is as it should be, and click the blue "Launch" button at the bottom right.
6.4.5. Create a key pair to access server instances
You will be presented with the key pair specification dialogue next
- If you already have a key pair, you can select it from the list. If you do not, you will need to create one to be able to access your instance. Choose "Create a new key pair" from the first dropdown, and enter a name for the keypair.
- Click on the blue "Launch Instances" button at the bottom right of the dialogue to proceed.

Click the blue "View Instances" button at the bottom right. You will see a list of your running instance, including the newly spooled up instance

6.5. STEP: Assign Elastic IPs to Instances
- Go to "Network & Security" -> "Elastic IPs"

- Select each of the elastic IPs you've already allocated and associate them with the running instances. NOTE: you will do this four times, one IP per instance

6.6. STEP: Copy the private IPs
- Now go back to the running instances
- Select the "Instance ID" of each of the machines (one by one)
- Copy and note somewhere the Private IP addresses:

6.7. STEP: Create Hosted Zones
Route 53 is Amazon's DNS service that will be used to route traffic internally.
- Go to Route53 -> "Hosted Zones" (https://console.aws.amazon.com/route53/v2/hostedzones)
- Select " Create hosted zone" on the right side of the page to create a reverse DNS zone
a. For the "Domain name" add the corresponding XXX.in-addr.arpa record, depending on your configuration. we used 31.172.in-addr.arpa
b. Select "Private hosted zone" for "Type"
c. Select your Region and VPC ID from "VPCs to associate with the hosted zone". Confirm with "Create hosted zone"
More Info
More info about the reverse DNS zones can be found here

6.8. STEP: Create PTR Record (reverse zones) Per Instance
From the "Hosted zone details" select "Create record":

From the "Quick create record" window add a record for each of the nodes by using the private IPs which were copied above.
Fill the details as follows:
1. The reverse IP for "Record name"
2. PTR as "Record type"
3. The actual hostname for the "Value"
4. Click create record

5. Add a PTR record for each of the machines (total of 4)
In the end, the hosted zone should look similar to the following:
Here we created one PTR record per machine

6.9. STEP: Create Forward Zones per Instance
- Go back to "Route53" -> "Hosted zones" in order to create a forward zone
a. Use the main domain you will use for "Domain name"
b. Again, use "Private hosted zone" as type
c. Select the appropriate "Region" and "VPC ID"
Confirm with "Create hosted zone" - Select "Create record" for each of the 4 machines
a. Add the subdomain for "Record name"
b. Select "A" as "Record type"
c. Enter the internal IP for "Value" - Add an A record for each of the machines (total of 4). In the end, the hosted zone should look similar to:

6.10. STEP: Setup External Domain DNS
Depending on where you are hosting you existing domain, it is time to configure A records pointing to external IPs assigned to the Instances.
- Add an A record for each Instance
- Use One IP as configured above making sure you are using the right IP of each instance
For example the A records for our sample domain setup looks like this on Network Solutions DNS manager:

7. STEP: Start installing Primary FileFlex Server
Connect with ssh to each of the machines and run the setup process.
Login using the default password (you will be prompted to change this later in the setup)
Username: sadmin
Password: Q!w2e3r4
As soon as you log in to the VM you will be presented with the following screen.
NOTE
Please make sure that Primary Machine is set up first.
STEP 1 Choose the language of choice

STEP 2 Choose "Primary or single machine"

STEP 3 Choose a password for sadmin account

STEP 4 SKIP this step

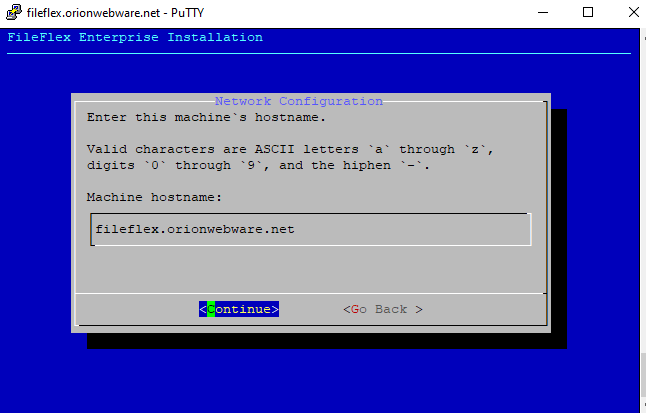
STEP 5 Enter the Primary domain that will be used to access the FileFlex server by end-users
STEP 6 WAIT!!!!!! this will take some time.....

PRIMARY Server is ready to be configured. Click Reboot

8. STEP: Start installing Secondary FileFlex Server
SSH into the Secondary Machines in sequence to start adding them to the cluster i.e. VM#2 then #3 and then #4
Login using the default password (you will be prompted to change this later in the setup)
Username: sadmin
Password: Q!w2e3r4
NOTE
The sequence is important to not cause any confusion. The primary machine was #1
Repeat these steps for adding or replacing any secondary machine in the cluster.
You will see the same initial screen on the first access
STEP 1 Choose language of choice

STEP 2 Choose Secondary machine in a cluster option

STEP 3 Choose a password for sadmin
STEP 4 SKIP this step
STEP 5 Enter the proper Secondary domain for the designated machine here

STEP 6 Now the VM is ready to be added to the Cluster, its time to open your web browser to access the Primary Machine
NOTE
We have made it very simple to add machines to the cluster, at this point this machine is awaiting connection from the Primary server.
The rest will be taken care of automatically.

NOTE: IF this happens and the timer expires after 30 minutes then run the following command
sudo /opt/ffs/setup.sh

9. STEP: Start configuring the FileFlex Server Cluster
STEP 1 Now you can access this machine using the hostname you have configured for the primary server at:
EXAMPLE: https://fileflex.orionwebware.net:9443
NOTE
Depending on which browser you use, you will see this warning message.
Since we have not yet installed a valid SSL certificate this warning is logical and you can ignore it and proceed to access the server.

STEP 2 Login using the sadmin username and password that you used for the primary machine.

STEP 3 Prompt to enter the FileFlex deployment ID and FileFlex deployment keys and click Verify

NOTE
You will find your keys in the FileFlex Enterprise Portal >> Add/Manage Deployments


STEP 4 Choose "Configure a high-availability cluster" option and click next

STEP 5 Setup your Global Admin credentials for Policy and Users management console

STEP 6 Almost ready to start adding machines.

STEP 7 Click OK to start

The setup will take few minutes to configure the Primary Server

STEP 8 When prompted enter the hostname of the machine awaiting addition to the cluster and sadmin password for that machine

NOTE: Primary Server will setup trust with secondary servers and automatically assign their roles in the cluster.

NOTE: the screen will update on the secondary machine as follows

STEP 9 And the Primary server keeps the setup going awaiting the next secondary servers

STEP 10 Follow the ok and Yes prompts


STEP 11 Once the setup completes. Some services may be stopped. Simply select them and click start icon to start them.
NOTE
PKI server will require an SSL certificate to be installed first so ignore the warning that it is stopped.

STEP 12 Finalize the setup in the control panel
- Setup mail server used to send notifications etc.
- Setup SSL Certificate (HELP on SSL Certificate Automated Installation)