| Sv translation | ||
|---|---|---|
| ||
FileFlex includes a photo sync feature that allows the backup of photos and videos, from as many smartphones and tablets as you want, to whatever storage you own. You can even set it to only back up when connected via Wi-Fi to not use up your cellular data. Note:
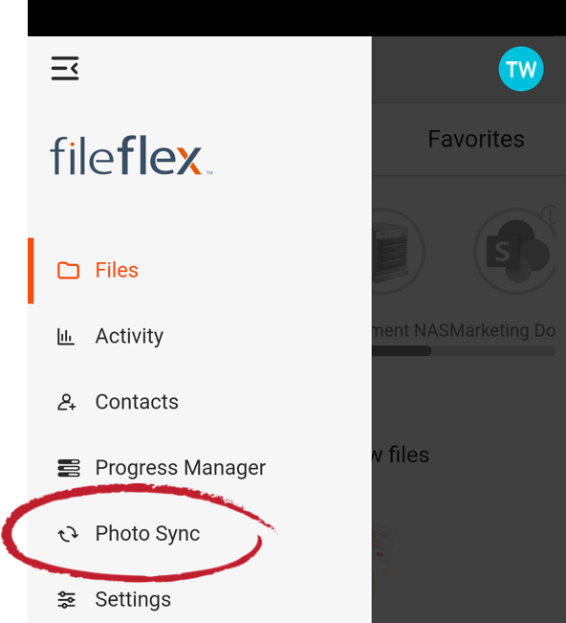
To use photo sync: 1. Open FileFlex on the phone or tablet that you want to photo and/or video sync. (You must have FileFlex installed already installed on the phone in order to sync it. Open the main menu by pressing the icon in the top left corner.
2. Select Photo Sync
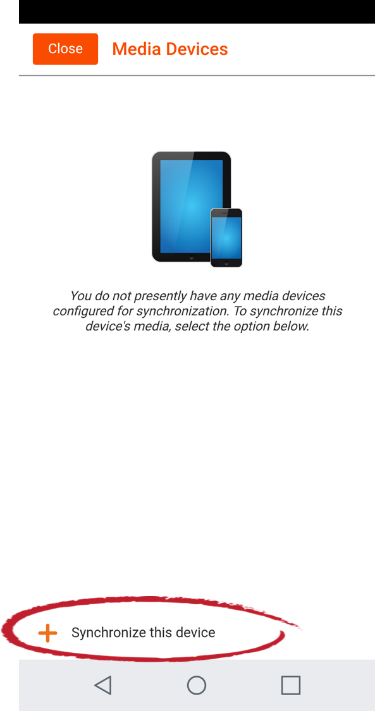
3. Choose Synchronize this device.
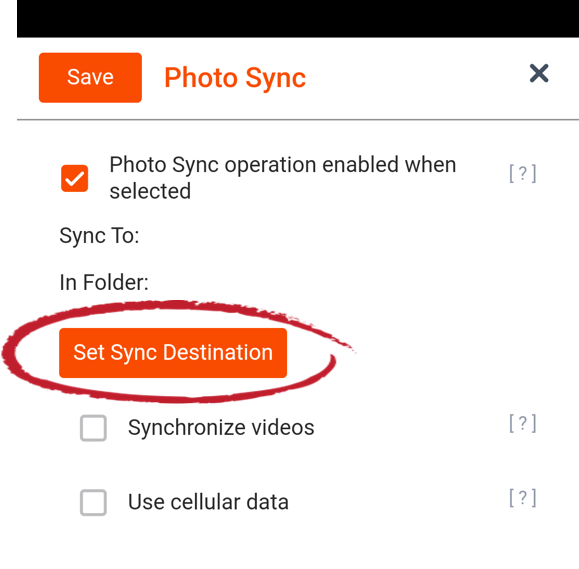
4. To determine the storage destination of your sync, click the Set Sync Destination button.
5. Navigate to the content repository that you want to sync to, then navigate to the folder that you want to sync to. You can also create a new folder if needed. (For help in setting up content repositories see Connecting to Your Content). 6. FileFlex will create a folder in this destination for your sync. You can give the folder its own name or accept the default name that FileFlex assigns. Click Create. 7. Set your sync options. a. Click the checkbox to synchronize videos and photos or unclick to only sync photos. FileFlex will sync only photos by default. b. Click the checkbox to sync over cellular data if Wi-Fi is unavailable or unclick to sync only over Wi-Fi. FileFlex will sync only over Wi-Fi by default. 8. Click Save when done. 9. Repeat steps 1-7 to add additional cellular phones and tablets to your photo sync. |

| Sv translation | ||
|---|---|---|
| ||
FileFlex includes a photo sync feature that allows the backup of photos and videos, from as many smartphones and tablets as you want, to whatever storage you own. You can even set it to only back up when connected via Wi-Fi to not use up your cellular data. Note:
To use photo sync: 1. Open FileFlex on the phone or tablet that you want to photo and/or video sync. (You must have FileFlex installed already installed on the phone in order to sync it. Open the main menu by pressing the icon in the top left corner.
2. Select Photo Sync
3. Choose Synchronize this device.
4. To determine the storage destination of your sync, click the Set Sync Destination button.
5. Navigate to the content repository that you want to sync to, then navigate to the folder that you want to sync to. You can also create a new folder if needed. (For help in setting up content repositories see Connecting to Your Content). 6. FileFlex will create a folder in this destination for your sync. You can give the folder its own name or accept the default name that FileFlex assigns. Click Create. 7. Set your sync options. a. Click the checkbox to synchronize videos and photos or unclick to only sync photos. FileFlex will sync only photos by default. b. Click the checkbox to sync over cellular data if Wi-Fi is unavailable or unclick to sync only over Wi-Fi. FileFlex will sync only over Wi-Fi by default. 8. Click Save when done. 9. Repeat steps 1-7 to add additional cellular phones and tablets to your photo sync. |
| Sv translation | |||||
|---|---|---|---|---|---|
|
| ||||
FileFlex incluye una función de sincronización de fotografías que permite realizar copias de respaldo de fotografías y vídeo, desde tantos teléfonos inteligentes y tabletas como desee, a cualquier almacenamiento de su propiedad. Incluso puede configurar la función para que realice las copias de respaldo únicamente cuando esté conectado vía Wi-Fi para no usar datos móviles. Nota:
Para usar la sincronización de fotografías: 1. Abra FileFlex en el teléfono o la tableta cuyas fotografías y/o vídeos desea sincronizar. (Debe tener FileFlex ya instalado en el teléfono para poder sincronizarlo.) Presione el icono en la esquina superior izquierda para abrir el menú principal.
2. Seleccionar Sincronizar fotografías
3. Escoja Sincronizar este dispositivo.
4. Para determinar el destino de almacenamiento de la sincronización, haga clic en el botón Definir destino de sincronización.
5. Navegue a la carpeta del repositorio de contenido donde desea que se sincronicen los archivos. Si fuera necesario, puede crear una nueva carpeta. (Si desea ayuda para configurar repositorios de contenido, consulte Conexión con su contenido). 6. FileFlex creará una carpeta en el destino para la sincronización. Puede designar la carpeta con su propio nombre o aceptar el nombre predeterminado que FileFlex le asigne. Haga clic en Crear. 7. Configurar las opciones de sincronización a. Haga clic en la casilla de verificación para sincronizar vídeos y fotografías o desmárquela para sincronizar únicamente fotografías. De manera predeterminada, FileFlex sincronizará únicamente fotografías. b. Haga clic en la casilla de verificación para sincronizar con datos móviles si Wi-Fi no está disponible o desmárquela para sincronizar únicamente vía Wi-Fi. De manera predeterminada, FileFlex sincronizará únicamente vía Wi-Fi. 8. Haga clic en Guardar cuando haya finalizado. 9. Repita los pasos 1 a 7 para añadir teléfonos móviles y tabletas adicionales a la sincronización de fotografías. |
| Sv translation | ||
|---|---|---|
| ||
FileFlex inclut une fonction de synchronisation de photos qui permet la sauvegarde de photos et de vidéos, à partir d'autant de smartphones et de tablettes que vous le souhaitez, vers le stockage que vous possédez. Vous pouvez même le configurer pour qu'il n'effectue de sauvegarde que lorsqu'il est connecté via Wi-Fi afin de ne pas utiliser vos données cellulaires. Remarque :
Pour procéder à la synchronisation de photos : 1. Ouvrez FileFlex sur l'appareil avec lequel vous souhaitez synchroniser des photos et/ou des vidéos. (FileFlex doit être déjà installé sur l'appareil). Ouvrez le menu principal en cliquant sur l'icône dans le coin supérieur gauche.
2. Sélectionnez Synchroniser les photos
3. Choisir Synchroniser cet appareil.
4. Pour déterminer la destination de stockage de votre synchronisation, cliquez sur le bouton Définir la destination de synchronisation.
5. Naviguez vers le référentiel de contenu vers lequel vous souhaitez synchroniser, puis accédez au dossier vers lequel vous souhaitez synchroniser. Vous pouvez également créer un nouveau dossier si nécessaire. (Pour obtenir de l'aide sur la configuration des référentiels de contenu, reportez-vous à la section « Connexion à votre contenu »). 6. FileFlex créera un dossier dans cette destination pour votre synchronisation. Vous pouvez donner au dossier un nom de votre choix ou accepter le nom par défaut attribué par FileFlex. Cliquez sur Créer. 7. Définissez vos options de synchronisation. a. Cochez la case pour synchroniser les vidéos et les photos ou décochez-la pour synchroniser uniquement les photos. Par défaut, FileFlex synchronisera uniquement les photos. b. Cochez la case pour synchroniser sur les données cellulaires au cas où le Wi-Fi n'est pas disponible ou décochez-la pour synchroniser uniquement sur le Wi-Fi. FileFlex se synchronise uniquement via Wi-Fi par défaut. 8. Cliquez sur Enregistrer quand c'est terminé. 9. Répétez les étapes 1 à 7 pour ajouter des téléphones cellulaires et des tablettes à votre synchronisation de photos. |
| Sv translation | ||
|---|---|---|
| ||
FileFlex include una funzione di sincronizzazione delle foto che consente di eseguire il backup di foto e video da tutti gli smartphone e i tablet che si desidera, su qualsiasi dispositivo di archiviazione. È anche possibile impostare il backup solo quando si è connessi via Wi-Fi per non consumare i dati del cellulare. Nota:
Per utilizzare la sincronizzazione delle foto: 1. Aprire FileFlex sul telefono o tablet che si desidera sincronizzare con foto e/o video. (Per sincronizzare il telefono è necessario che FileFlex sia già installato. Aprire il menu principale premendo l'icona in alto a sinistra.
2. Selezionare Sincronizzazione foto
3. Scegliere Sincronizza questo dispositivo.
4. Per determinare la destinazione di archiviazione della sincronizzazione, fare clic sul pulsante Imposta destinazione sincronizzazione.
5. Passare al repository dei contenuti che si desidera sincronizzare, quindi passare alla cartella che si desidera sincronizzare. Se necessario, è possibile creare una nuova cartella. (Per informazioni sull'impostazione dei repository dei contenuti, vedere Connessione ai contenuti). 6. FileFlex creerà una cartella in questa destinazione per la sincronizzazione. È possibile assegnare alla cartella un nome proprio o accettare il nome predefinito assegnato da FileFlex. Fare clic su Crea. 7. Impostare le opzioni di sincronizzazione. a. Fare clic sulla casella di controllo per sincronizzare video e foto o deselezionare per sincronizzare solo le foto. Per impostazione predefinita, FileFlex sincronizza solo le foto. b. Fare clic sulla casella di controllo per sincronizzarsi con i dati del cellulare se il Wi-Fi non è disponibile o deselezionarla per sincronizzarsi solo con il Wi-Fi. Per impostazione predefinita, FileFlex sincronizza solo con il Wi-Fi. 8. Al termine, fare clic su Salva. 9. Ripetere le fasi da 1 a 7 per aggiungere altri telefoni cellulari e tablet alla sincronizzazione delle foto. |