| Sv translation |
|---|
|
ProblemHow to upgrade the FileFlex server operating system from Ubuntu 18.04 to Ubuntu 20.04
Take a snapshot (**IMPORTANT**)This is the most important step. Whatever platform you are using to manage the FileFlex Virtual Machine, please take a snapshot of the VM before continuing. Solution 1 - upgrade from Server Admin
| Info |
|---|
| Caution & Note: OS upgrade is a very complicated process and we have tried to make it simpler to initiate a OS upgrade from Server Admin however if any process does not go as planned, you will need to revert to snapshot and try our manually prescribed method to upgrade the OS. |
Follow these steps. - Login into the Server Administration page
- Upgrade the FileFlex server to version 3.23.
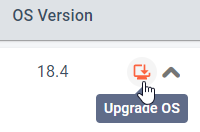
- After this, you will see the icon in SA to upgrade the OS
- Take a snapshot of the VM at this step
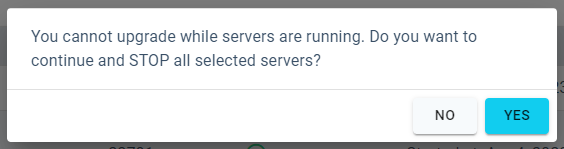
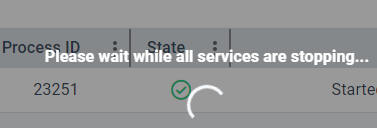
- Stop all servers except Administration and Storage Server
- Perform Backup Now from Backup & Restore
- Download the newly-created backup to your local storage
- Navigate back to the Server Administration page and look for OS Upgrade icon on the right order of the screen
- Click on this icon to initiate the upgrade
 - You will see a warning with instructions
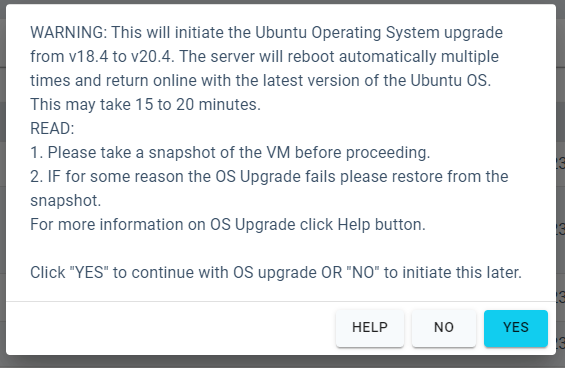 - Click Yes to proceed with the upgrade
   - The VM will be rebooted multiple times for the upgrade to complete.
NOTE: The OS upgrade can take up to 30 to 40 minutes, so give it time to upgrade. How long to wait?If anything goes wrong and the VM becomes inaccessible Restore the VM snapshot and follow the manual upgrade process detailed below. Solution 2 - manual upgrade with os_upgrade scriptFollow these proposed steps: - Login into Server Administration page
- Stop all servers except Administration and Storage Server
- Perform Backup Now from Backup & Restore
- Download the newly-created backup to your local storage
- Depending on where your VM is hosted (VMWare Workstation, VirtualBox, HyperV, etc), go to its terminal and login with the user sadmin
Type lsb_release -a. If it returns Ubuntu 20, then everything is OK and there is no need to continue. Distributor ID: Ubuntu
Description: Ubuntu 20.04xx.5 x LTS
Release: 20.04xx
Codename: focal |
|---|
- Type sudo /opt/ffs/os_upgrade.sh
- The process of upgrading the operating system will start.
- It will perform an automatic reboot. Once done, you will be asked again to login
- The process will start automatically, no user-interaction is required from your side, just wait to reboot once again
- Once ready, you will see: Ubuntu 20.04xx.6x. LTS
- And that's it, now you can go back to Server Admin and start all servers in order to continue using our application.
Solution 3 - manual OS upgrade prior FileFlex scriptLogin into FileFlex Enterprise Server Administration pageStop all servers except Administration and Storage ServerPerform Backup Now from Backup & RestoreDownload the newly-created backup to your local storageDepending on where your VM is hosted (VMWare Workstation, VirtualBox, HyperV, etc), go to its terminal and login the user sadminType lsb_release -a.
6.1. If it returns Ubuntu 20.04.3, go back to Server Administration page and press the Upgrade Machine button |
Distributor ID: Ubuntu
Description: Ubuntu 20.04.5 LTS
Release: 20.04
Codename: focal
|
6.2. If it returns Ubuntu 18.xx.xx you should manually upgrade OS through the terminal
Run sudo mv /etc/apt/sources.list.d/ffs.list /etc/apt/sources.list.d/ffs.list.back to disable temporary fileflex repository Run sudo apt-get updateRun sudo apt dist-upgrade
This will upgrade the OS system and all system packages to Ubuntu 18.04.6.
Reboot the system when requested once the upgrade process completes.If system reboot is not requested use the sudo reboot commandAfter system reboot, login to server console and type sudo do-release-upgrade --mode=server -f DistUpgradeViewNonInteractive
This command will upgrade system to new release 18.04.
During this step upgrade you might be asked to keep sysctl.conf file
 Image Removed
Type N or O
Run sudo reboot to restart the system Use the lsb_release -a command to check the OS version. It should point to Release: 18.04.
Enable fileflex repository running sudo mv /etc/apt/sources.list.d/ffs.list.back /etc/apt/sources.list.d/ffs.listRun sudo apt-get update Load FileFlex Server Administration pagePress the Upgrade Machine button If you encounter any issues during the upgrade process refer to the troubleshooting list.
Troubleshooting
If you encounter any issues during the upgrade process refer to the current troubleshooting list.
- If you see the following:
E: Could not get lock /var/lib/apt/lists/lock - open (11: Resource temporarily unavailable)
E: Unable to lock directory /var/lib/apt/lists/
sadmin@hostname:~#
|
This means that you have to retype again sudo /opt/ffs/os_upgrade.sh in a while. The lock of the resource will be self released.
The lock message may be seen after rebooting when the upgrade script results as well, so be sure to look for it when the upgrade resumes post-restart.
2. If for some reason the process is aborted, please do the following:
- If you host machine is running under Windows, install WinSCP program, if it is not already installed. If your host machine is OSX or some linux distribution, then skip this step
- Connect to the Virtual machine with WinSCP by creating a session with SCP protocol and supplying credentials of the sadmin user.
- Navigate to path "/var/log" and download the file syslog
- Make a capture of terminal reporting a problem as well
- Send email to support@fileflexcom with both the log and the capture
3. If for some reason there are packages in apt cache marked as upgradable or system needs reboot during previous system update do-release-upgrade part of script will not work but script will continue on update steps in os_upgrade.sh
The part of script with apt-get upgrade after do-release-upgrade will upgrade ffs packages on not upgraded OS 16. Unfortunately ffs packages are not compatible with Ubuntu 16 and python version < 3.6.9 and thus they left in broken state. To fix such situation:
Disable fileflex repository.
sudo mv /etc/apt/sources.list.d/ffs.list /etc/apt/sources.list.d/ffs.list.backDo sudo apt-get updatesudo apt-get upgradesudo apt-get dist-upgradesudo rebootsudo do-release-upgrade --mode=server -f DistUpgradeViewNonInteractivesudo mv /etc/apt/sources.list.d/ffs.list.back /etc/apt/sources.list.d/ffs.listrebootUpdate server from serveradmin GUITroubleshooting
If you encounter any issues during the upgrade process refer to the current troubleshooting list.
- Connect to the Virtual machine with WinSCP by creating a session with SCP protocol and supplying credentials of the sadmin user.
- Navigate to path "/opt/ffs/log/" and download the file os_upgrade.log
- Send email to support@fileflexcom with the log file
| Sv translation |
|---|
|
問題FileFlex サーバーのオペレーティングシステムを Ubuntu16.04 から Ubuntu18.04 にアップグレードする方法 ソリューション 1- os_upgrade スクリプトを使用してアップグレードする次の手順に従ってください。 - [サーバー管理] ページにログインします
- 管理サーバーと ストレージサーバーを除くすべてのサーバーを停止します
- バックアップと復元から今すぐバックアップを実行します
- 新しく作成したバックアップをローカルストレージにダウンロードします
- VM がホストされている場所 (VMWare Workstation、VirtualBox、HyperV など) に応じて、そのターミナルに移動し、ユーザーsadmin でログインします。
「lsb_release -a」と入力します。 Ubuntu 18 が返される場合は、問題は発生しておらず、続行する必要はありません。 ディストリビューター ID: Ubuntu
説明: Ubuntu 18.04.3 LTS
リリース: 18.04
コードネーム: bionic
|
- 「 sudo /opt/ffs/os_upgrade.sh」と入力します
- オペレーティングシステムをアップグレードするプロセスが開始されます。
- 自動再起動を実行します。完了すると、再度ログインするように求められます
- プロセスは自動的に開始されます。ユーザーの操作は必要ありません。もう一度再起動するのを待つだけです。
- 準備ができたら、次のように表示されます。Ubuntu 18.04.3。LTS
- これで、サーバー管理に戻ってすべてのサーバーを起動し、アプリケーションを引き続き使用できます。
ソリューション 2 - FileFlex スクリプトの前に手動で OS アップグレードを行う- FileFlex Enterprise サーバー管理ページにログインします
- 管理サーバーとストレージサーバー以外のサーバーをすべて停止します
- バックアップと復元から今すぐバックアップを実行します
- 新しく作成したバックアップをローカルストレージにダウンロードします
- VM がホストされている場所 (VMWare Workstation、VirtualBox、HyperV など) に応じて、そのターミナルに移動し、ユーザー sadmin でログインします。
「 lsb_release -a.
6.1.」と入力しますUbuntu 18.04.3 が返される場合は、[サーバー管理] ページに戻り、[マシンのアップグレード] ボタンをクリックします。 ディストリビューター ID: Ubuntu
説明: Ubuntu 18.04.3 LTS
リリース: 18.04
コードネーム: bionic
|
6.2.Ubuntu 16.xx.xx が返される場合は、ターミナルから手動で OS をアップグレードする必要があります - sudo mv/etc/apt/sources.list.d/ffs.list/etc/apt/sources.list.d/ffs.list.back を実行して、一時的な FileFlex リポジトリを無効にします
- sudo apt-get update を実行します
- sudo apt dist-upgrade
を実行します。これにより、OS システムとすべてのシステムパッケージが Ubuntu16.04.7 にアップグレードされます。 - 注: Oracle VirtualBox で Ubuntu OS をアップグレードする場合は、次のように表示される場合があります。
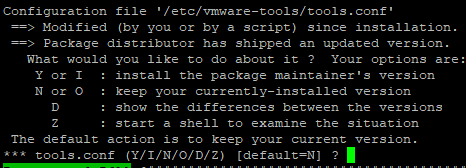
Choose Y or I : install the package maintainer's version for tools.conf
このステップのアップグレード中に、clamd パッケージ設定を保持するように求められる場合があります。

[現在インストールされているローカルバージョンを保持する] を選択します
アップグレードプロセスが完了したら、要求され次第システムを再起動します。 - システムの再起動がリクエストされない場合は、 sudo reboot コマンドを使用します
- システムの再起動後、サーバーコンソールにログインし、「sudo do-release-upgrade --mode=server -f DistUpgradeViewNonInteractive
」と入力します。このコマンドにより、システムは新しいリリース 18.04 にアップグレードされます。
このステップのアップグレード中、sysctl.conf ファイル
TypeN または O を保持するように求められる場合があります
- sudo reboot を実行して、システムを再起動します
- lsb_release -a コマンドを使用して、OSのバージョンを確認します。 それにより、次のリリースを指すはずです: 18.04.
- sudo mv /etc/apt/sources.list.d/ffs.list.back /etc/apt/sources.list.d/ffs.list を実行している FileFlex リポジトリを有効にします
- sudo apt-get 更新を実行します
- [FileFlex サーバー管理] ページを読み込みます
- [マシンのアップグレード] ボタンを押します
アップグレードプロセス中に問題が発生した場合は、トラブルシューティングリストを参照してください。
トラブルシューティング アップグレードプロセス中に問題が発生した場合は、現行のトラブルシューティングリストを参照してください。 - 以下が発生した場合:
E: ロックできませんでした /var/lib/apt/lists/lock - open (11: リソースが一時的に利用できません)
E: ディレクトリ /var/lib/apt/lists/
sadmin@hostname:~# をロックできません
|
その場合、しばらくしてから sudo /opt/ffs/os_upgrade.sh を再入力する必要があります。リソースのロックは自ずと解放されます。 再起動後、アップグレードスクリプトがそのようになったときにもロックメッセージが表示される場合があるため、再起動後にアップグレードが再開されたときに確認してください。
2.何らかの理由でプロセスが中止された場合は、次の手順を実行してください。 - ホストマシンが Windows で実行されている場合、WinSCP プログラムがまだインストールされていないときは、インストールします。ホストマシンが OSX または一部の Linux ディストリビューションの場合は、この手順をスキップしてください
- SCP プロトコルでセッションを作成し、sadmin ユーザーの認証情報を指定して、WinSCP で仮想マシンに接続します。
- パス「/var/log」に移動し、syslog ファイルをダウンロードします
- 問題を報告している端末もキャプチャします
- ログとキャプチャの両方を記載した E メールを support @ FileFlexcom に送信します
3.何らかの理由でアップグレード可能としてマークされたパッケージが apt キャッシュにある場合、または以前のシステム更新中にシステムを再起動する必要がある場合、スクリプトの do-release-upgrade の部分は機能しませんが、スクリプトは os_upgrade.sh の更新手順を続行します do-release-upgrade の後に apt-getupgrade を使用するスクリプトの一部は、アップグレードされていない OS16 で ffs パッケージをアップグレードします。残念ながら、ffs パッケージは Ubuntu 16 および python バージョン 3.6.9 以降と互換性がないため、動作しない状態のままになります。 このような状況を修正するには、以下の手順に従ってください。 - FileFlex リポジトリを無効にします。
sudo mv /etc/apt/sources.list.d/ffs.list /etc/apt/sources.list.d/ffs.list.back - Do sudo apt-get update
- sudo apt-get upgrade
- sudo apt-get dist-upgrade
- sudo reboot
- sudo do-release-upgrade --mode=server -f DistUpgradeViewNonInteractive
- sudo mv /etc/apt/sources.list.d/ffs.list.back /etc/apt/sources.list.d/ffs.list
- reboot
- serveradmin GUI からサーバーを更新します
|
...