Page tree

Versions Compared

Key

  • This line was added.
  • This line was removed.
  • Formatting was changed.
Sv translation
languageen


Note: You will need authorization from your IT department in order to be able to import your Outlook contacts. If you have permission, use the following steps to import Outlook contacts.


Note: The following instructions are from the 2016 version of Outlook, other versions will be very similar. If you have a different version of outlook, see Microsoft's Help Page for exporting contacts to a .csv file, then continue with step 7 of this tutorial.


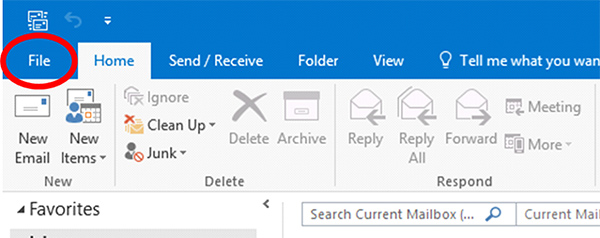
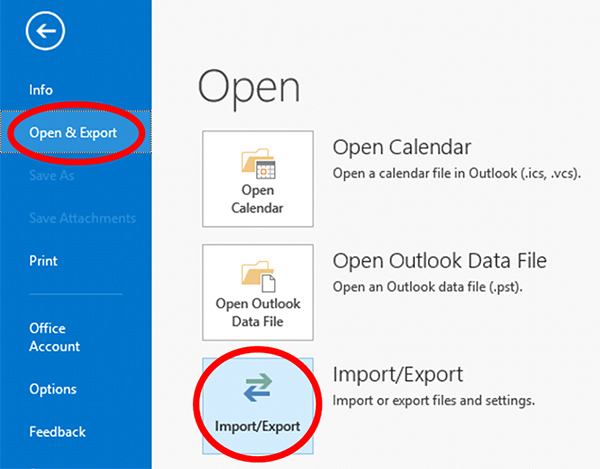
Open 1. Open Outlook. In the top left, click File. In the dropdown menu that appears, click Open & Export and then Import/Export.


Image Modified
Select File


Image RemovedImage Added
Select 'Open & Export', then 'Import/Export'


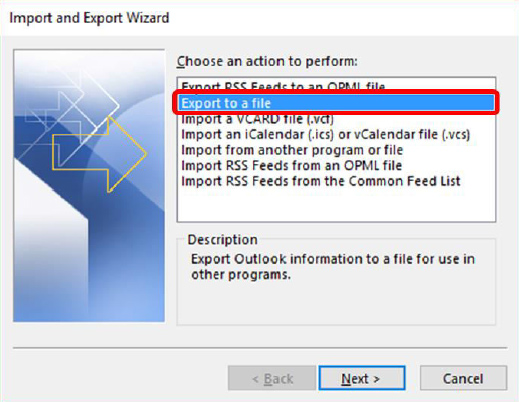
2. In the Import and Export Wizard select Export to a file, then select Next.


Image Modified
Select 'Export to a file', then Next


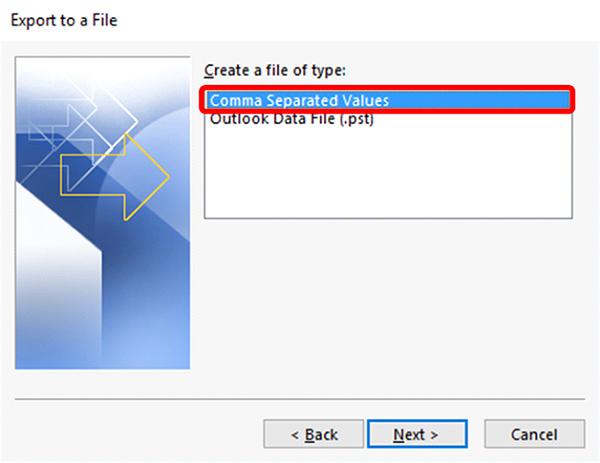
3. Choose Comma Separated Values and select Next.

Image Modified
Select 'Comma Separated Values', then Next

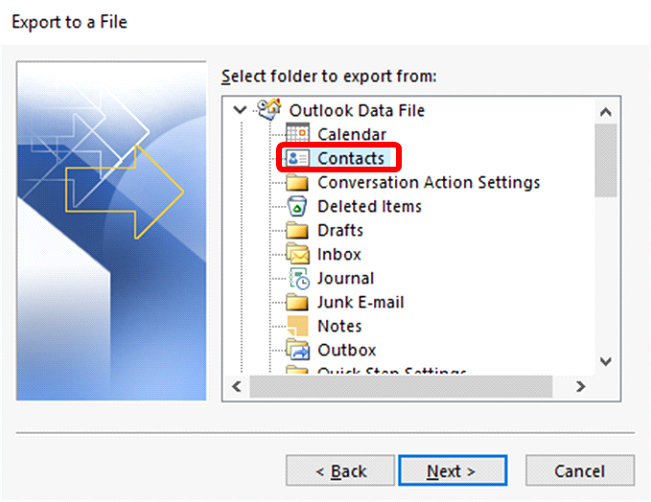
4. In the next Export to a File dialog box, find your Contacts folder and select it, then select Next.

Image Modified
Select the 'Contacts' folder, then click Next

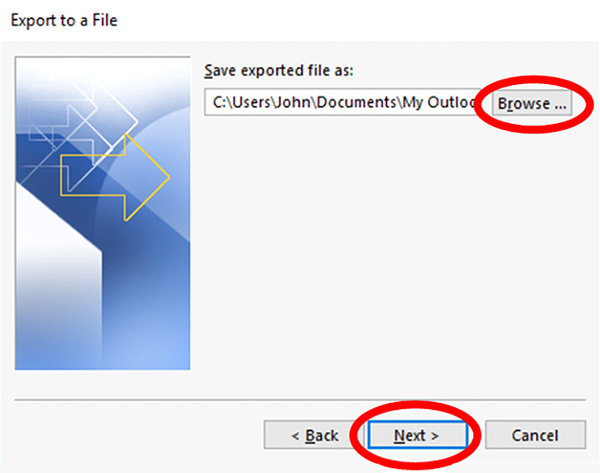
5. In the next screen, click Browse and navigate to the location you want to save the .csv file to. You'll need to find this later to import to FileFlex, so give it a memorable name and click Next.

Image Modified
Save the exported file, then click Next


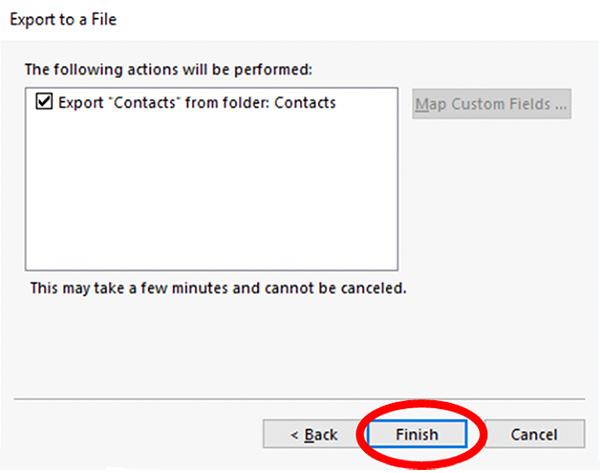
6. In the next Export to a File dialog box, select Finish.


Image Modified
Click Finish


7. Open FileFlex and open the contact view by selecting Contacts in the Application sidebar menu

8. Click the Activity Menu icon in the top right of the Activity Bar

9. Choose Import Contacts


Image Modified
Import Contacts


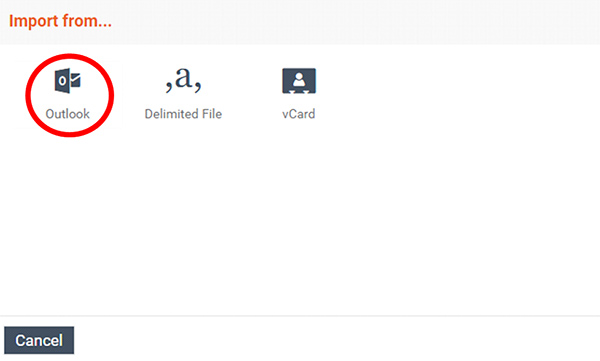
10,. In the "Import from" dialog box, select Outlook.


Image RemovedImage Added
Select Outook


11. Optionally put the imported contacts into a group or create a new group, then hit Next.

12. In the Import from the delimited file dialog box, select Choose File.

13. Navigate to the contacts file you exported from Outlook and select Upload. The default download location is your Downloads folder.

14. In the Contacts Imported dialog box, select Done.


Sv translation
languageja_JP


: Outlook の連絡先をインポートするには、IT 部門の承認が必要です。 権限がある場合は、次の手順に従って Outlook の連絡先をインポートします。
: 次の手順は 2016 年版の Outlook からのものですが、他のバージョンも大差はありません。 Outlookのバージョンが異なる場合は、Microsoft のヘルプページで連絡先を .csv ファイルにエクスポートする方法を参照してから、このチュートリアルのステップ 7 に進んでください。

  1. Outlook を開きます。 左上の [ファイル] をクリックします。 表示されるドロップダウンメニューで、[開いてエクスポート] をクリックしてから、[インポート/エクスポート] をクリックします。


[ファイル] を選択します

[開いてエクスポート]、[インポート/エクスポート] の順に選択します

  1. インポートおよびエクスポートウィザードで、[ファイルにエクスポート] を選択し、[次へ] をクリックします。


[ファイルにエクスポート] を選択してから、[次へ] をクリックします。

  1. [カンマ区切り値] を選択し、[次へ] をクリックします。


[カンマ区切り値] を選択し、[次へ] をクリックします。

  1. 次の [ファイルへのエクスポート] ダイアログボックスで、[連絡先] フォルダを見つけて選択してから、[次へ] をクリックします。


[連絡先] フォルダを選択し、[次へ] をクリックします

  1. 次の画面で、[参照] をクリックし、.csv ファイルを保存したい場所に移動します。 FileFlex にインポートするためにこれを後で見つける必要があるため、覚えやすい名前を付けて [次へ] をクリックします。


エクスポートされたファイルを保存してから、[次へ] をクリックします

  1. 次の [ファイルへエクスポート] ダイアログボックスで、[完了] を選択します。


[完了] をクリックします。

  1. FileFlexを開き、アプリケーションのサイドバーメニューで [連絡先] を選択して連絡先ビューを開きます
  2. アクティビティバーの右上にある [アクティビティメニュー] アイコンをクリックします
  3. [連絡先のインポート] を選択する


連絡先のインポート

  1. [インポート元] ダイアログボックスで、[Outlook] を選択します。


[Outook] を選択します

  1. 必要に応じて、インポートした連絡先をグループに追加するか、新しいグループを作成してから、[次へ] をクリックします。
  2. [区切りファイルからインポート]ダイアログボックスで、[ファイルの選択] をクリックします。
  3. Outlook からエクスポートした連絡先ファイルに移動し、[アップロード] を選択します。 デフォルトのダウンロード場所は、ダウンロードフォルダです。
  4. [インポートされた連絡先] ダイアログボックスで、[完了] を選択します。