Page tree

Versions Compared

Key

  • This line was added.
  • This line was removed.
  • Formatting was changed.
Sv translation
languageen


Note: You will need authorization from your IT department in order to be able to group contacts. If you have permission, use the following steps to group contacts.

Open


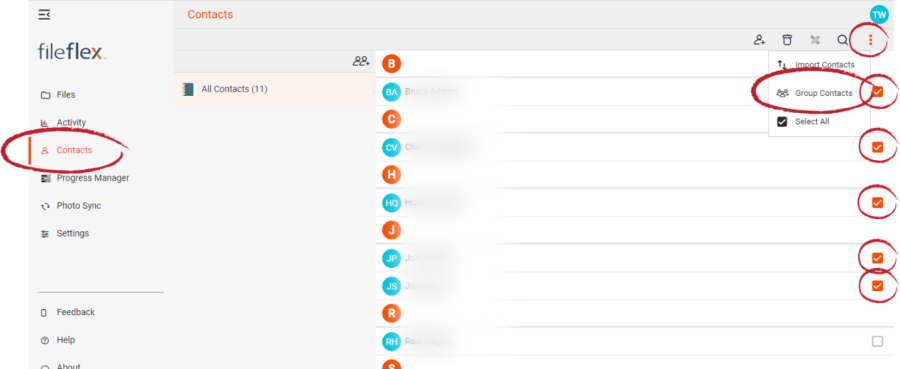
1. Open the contact view by selecting Contacts in the Application sidebar menu

2. Select the contact(s) that you want to group

3. Click the Activity Menu icon in the top right of the Activity Bar

4. Choose Group Contacts


Group Contacts

5. In the Groups dialog box, you can assign the contacts to a pre-existing group or you can create a new group. To create a new group, select Create a new group.

6. In the New Group dialog box, enter a name and then select OK.


Sv translation
languageja_JP


注: 連絡先をグループ化するには、IT 部門の承認が必要です。 権限がある場合は、次の手順に従って連絡先をグループ化します。

  1. アプリケーションのサイドバーメニューで [連絡先] を選択して、連絡先ビューを開きます
  2. グループ化する連絡先を選択します
  3. アクティビティバーの右上にある [アクティビティメニュー] アイコンをクリックします
  4. [連絡先のグループ化] を選択します。


連絡先のグループ化

  1. [グループ] ダイアログボックスで、連絡先を既存のグループに割り当てるか、新しいグループを作成できます。 新しいグループを作成するには、[新しいグループの作成] を選択します。
  2. [新しいグループ] ダイアログボックスで、名前を入力してから、[OK] を選択します。