| Sv translation | ||
|---|---|---|
| ||
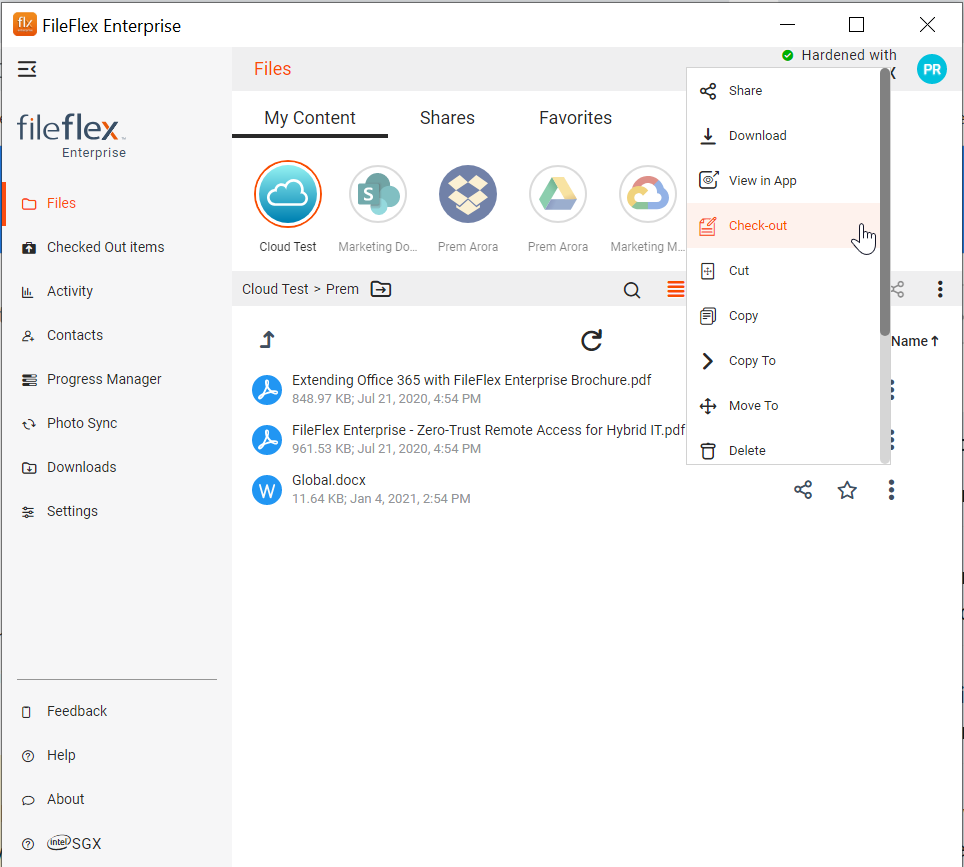
When you remotely make edits to files, FileFlex will save the edited file back to the source storage repository while keeping a version history that you can revert to if needed. To remotely edit a file: 1. Open the storage repository where the file is located and navigate to the file and click its activity menu (3 dots). In the dropdown, choose 'Check-out'.
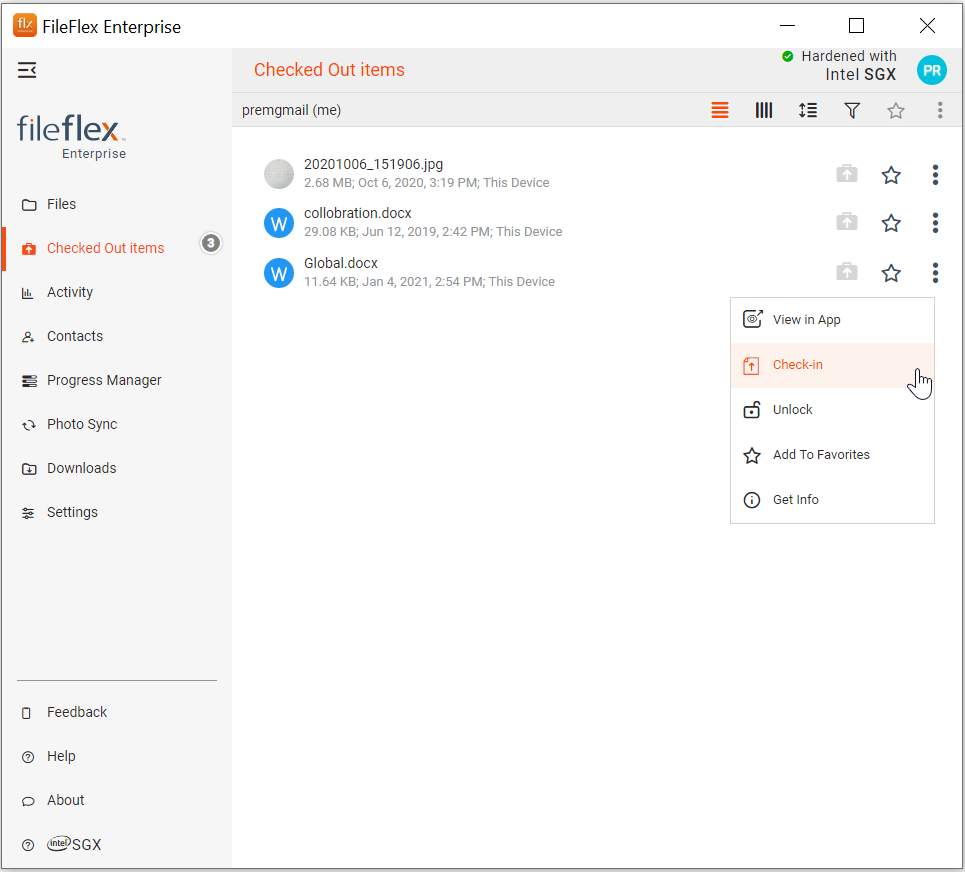
Choose Check-out Note: Once you check-out, the file is marked as locked. No other user who has access to the same file can make any changes to it. Other users can only preview the file till the time file is checked-in again. 2. If you are using a FileFlex desktop or mobile application, the file will be downloaded to the "Downloads" folder. You can access the same folder from your FileFlex Side-bar. 3. If you are using a web browser to access Fileflex, then the file is downloaded as per your browser settings. 4. Navigate to the downloaded file ( using Downloads located on FF Client Sidebar, or browser download location). 5. Open the file in your native application( e.g. MS Office, Photoshop, AutoCAD, etc ) make changes, and save it. 6. Once you are done with your changes, Go back to FileFlex so that you can check-in ( meaning submit your changes or upload ) the file back to the same location where it was taken from. 7. Go back to FileFlex. 8. FileFlex tracks all the files that are being edited by you in one place. Click "Checked Out Items) and navigate to your file and click the activity menu ( 3 Dot menu) as shown below. Click 'Check-in' 9. FileFlex copies the file back to the source storage repository location, versions it, deletes the file from your remote device, and unlocks it in the source location so that others can now edit it. 10. If you are using a web browser, on clicking "Check-in" you will be prompted to provide the original path where it was checked out. Key ConceptsCheck-OutFileFlex allows you to edit any file where you have been granted edit permissions. You can be granted file access in the below ways
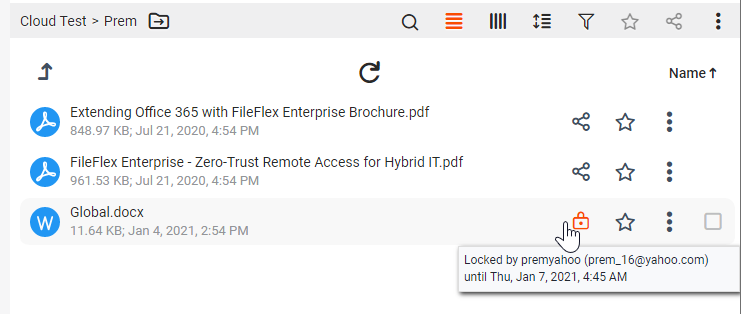
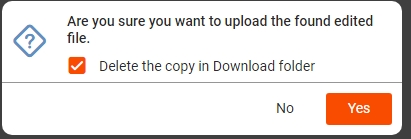
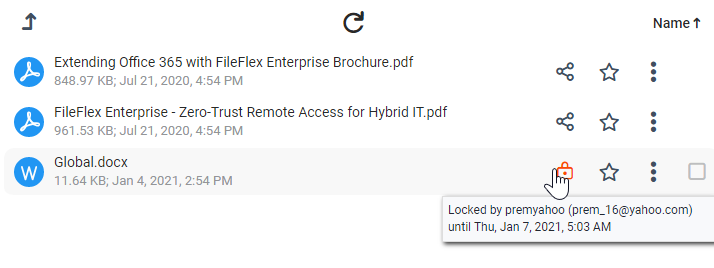
Since the files can be accessed by other users ( in scenarios 2 & 3 above ), as a user you want to ensure no one else modifies the file while you are editing that document. In order to achieve the same, the file needs to be downloaded to your local device and is marked as locked. When other users access the file which is marked as locked, FileFlex notifies them that they can't edit the document as it is being edited by another user. Check-Out is a one-step operation in FileFlex which downloads the file to your local device and marks it as locked. Once you click Check-Out, files get downloaded to the "Downloads" path. If you are using a FileFlex desktop client, you can navigate to this location by clicking "Downloads" from the side-bar. This opens the device explorer and you can now use any relevant application to edit those documents. E.g. MS Office, Adobe Photoshop, AutoCAD, etc Once you are done with your changes, you need to save the document to the same location. Check-inOnce you are done with your changes in a file, you want to ensure the updated file is stored back to the place from where you checked out the file. You also want to ensure file status gets changed from locked to available so that it is available to other users as well for editing. Check-in is a one-step process, which does the above tasks. If you are using FileFlex Desktop Client, then FileFlex remembers where the file was downloaded and you don't need to provide the path of the modified file. On clicking "Check-in" in a desktop client, you need to confirm your changes, and the file is uploaded and unlocked If you are using a web browser, you will be prompted to provide the location of the modified document, so that it can be stored back with changes. File Lock StatusA file is marked as locked if any user that has access to the same file is making changes to it. Once a file is being edited it is shown with a locked status on it. If you are editing your own files, the following icon is displayed. If a file is being edited by another user, the following icon is displayed.
Unlock FileOnce you have checked-out a file and have thus locked the file, you can do two operations on the file
Clicking "Unlock" simply release the lock you had put up on the file and doesn't require you to upload an unmodified version. FileFlex keeps track of file revision and your changes are discarded and the file can be modified by other users now. On clicking "Unlock", you are asked for confirmation and FF does the rest. |
| Sv translation | ||
|---|---|---|
| ||
(注: チェックアウトすると、ファイルはロック済みとしてマークされます。そのファイルにアクセスできる他のユーザーは、ファイルに変更を加えることはできません。他のユーザーは、ファイルが再度チェックインされるまでファイルをプレビューすることはできます。) 1 FileFlex デスクトップアプリケーションまたはモバイルアプリケーションを使用している場合、ファイルは [ダウンロード] フォルダにダウンロードされます。 このフォルダへは、FileFlex サイドバーからアクセスできます。 2. FileFlex へのアクセスにウェブブラウザを使用してしている場合、ファイルはブラウザの設定に従ってダウンロードされます。
重要な概念チェックアウトFileFlex を使用すると、編集権限が付与されているあらゆるファイルを編集できます。ファイルへのアクセスは、以下の方法で行うことができます
ファイルへは他のユーザーがアクセスできるため (上記のシナリオ 2 および 3) 、ユーザーとして、そのドキュメントの編集中に他のユーザーがファイルを変更しないようにする必要があります。 そうするには、ファイルをローカルデバイスにダウンロードし、ロック済みとしてマークする必要があります。 ロック済みとしてマークされているファイルに他のユーザーがアクセスすると、FileFlex は、他のユーザーが編集しているため、ドキュメントを編集できないことを通知します。 チェックアウトは、ファイルをローカルデバイスにダウンロードし、ロック済みとしてマークする FileFlex のワンステップ操作です。 [チェックアウト] をクリックすると、ファイルが [ダウンロード] パスにダウンロードされます。 FileFlex デスクトップクライアントを使用している場合は、サイドバーから [ダウンロード] をクリックして、この場所に移動できます。 これにより、デバイスエクスプローラーが開き、関連するアプリケーションを使用してこれらのドキュメントを編集できるようになります。 例: MS Office、Adobe Photoshop、AutoCAD など 変更が完了したら、ドキュメントを同じ場所に保存する必要があります。 チェックインファイルの変更が完了したら、更新されたファイルがファイルをチェックアウトした元の場所に確実に保存する必要があります。 また、ファイルのステータスを「ロック」から「使用可能」に変更し、他のユーザーも編集できるようにする必要があります。 チェックインは、上記のタスクを実行するワンステッププロセスです。 FileFlex デスクトップクライアントを使用している場合、FileFlex はファイルのダウンロード元の場所を記憶しているため、変更されたファイルのパスを指定する必要はありません。 デスクトップクライアントで [チェックイン] をクリックすると、変更を確認するよう求められ、ファイルがアップロードされてロックが解除されます ウェブブラウザを使用している場合は、変更を反映して保存できるように、変更されたドキュメントの場所を指定するように求められます。 ファイルロックステータスファイルにアクセスできるユーザーがファイルに変更を加えている場合、そのファイルはロック済みとしてマークされます。 ファイルの編集中は、ロック済みの状態で表示されます。 自分のファイルを編集している場合は、ファイルの前に次のアイコンが表示されます。 ファイルが別のユーザーによって編集されている場合は、次のように表示されます
ファイルのロック解除ファイルをチェックアウトしてファイルをロックしたら、ファイルに対して 2 つの操作を実行できます。
[ロック解除] をクリックすると、単純にファイルに設定したロックが解除されます。変更を加えていないバージョンをわざわざアップロードする必要はありません。 FileFlex はファイルの改訂を追跡し、変更は破棄され、他のユーザーはファイルを変更できるようになります。 [ロック解除] をクリックすると,、ユーザーは確認を求められ、FileFlex が後の処理を行います。 |


