Page tree

Versions Compared

Key

  • This line was added.
  • This line was removed.
  • Formatting was changed.
Sv translation
languageen

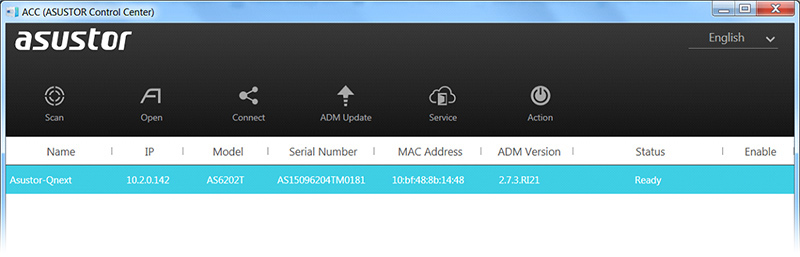
Note: You will need authorization from your IT department in order to be able to connect to an ASUSTOR NAS. If you have permission, use the following steps to connect to an ASUSTOR NAS.


Step 1: Install the FileFlex Connector on the ASUSTOR NAS.(


Note: You must be already set up as a user on your ASUSTOR with credentials in place. Users are created by the administrator through ASUSTOR Control Center > click your NAS > Access Control > Local Users > Add - see the Installation Guide

.)

.

  1. Log in to the ASUSTOR NAS through the ASUSTOR Control Center. (For more information about setting up an ASUSTOR NAS and installing ASUSTOR Control Center, see the Installation Guide.
    1. Make sure your computer is connected to the same network as the ASUSTOR NAS and can access the Internet.
    2. Download the ASUS Control Center software from the ASUSTOR website here.
    3. Launch ASUSTOR Control Center. ASUSTOR Control Center will find the ASUSTOR NAS on the local network. Select your NAS, then click Login.

Image Modified
Use ASUSTOR Control Center to find and log in to your NAS

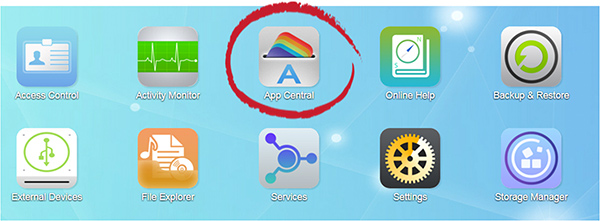
2. Enter the administrator username and password, and log in.

When

3. In the ASUSTOR NAS control panel, select the App Central icon.

Image Modified
Select App Central

When

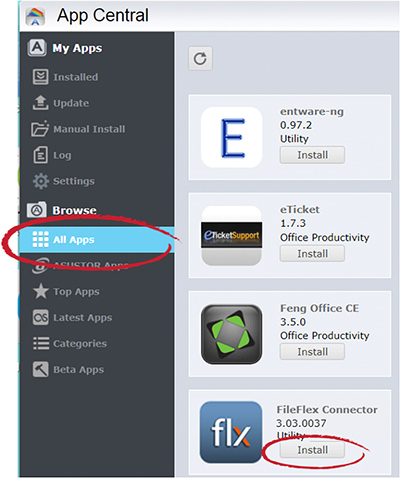
4. hen the App Central opens, in the left navigation bar select All Apps, then scroll down to FileFlex Connector, click Install


Image Modified
Select All Apps, scroll to FileFlex Connector click Install.


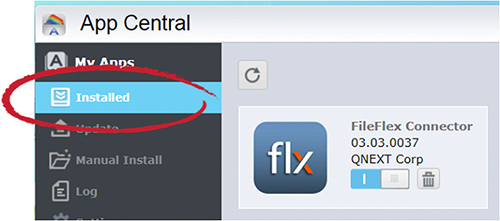
5. App Central will download and install the FileFlex Connector on the NAS. When it is finished, confirm that it is installed and ON. In the left-hand navigation bar, click My Apps, then Installed and check to see that FileFlex Connector is there and that it is ON.


Image Modified
Select My Apps >> Installed and check to see that the FileFlex Connector is installed on ON.


Step 2: Link your FileFlex account to the ASUSTOR NAS.


NOTE: The PC should be connected to the NAS over the same network.

  1. Next, you must link your FileFlex account to your ASUSTOR NAS. From your PC or mobile device with FileFlex already installed and connected to the NAS over the same network whether via LAN or Wi-Fi, open FileFlex.
  2. Select the 'Files' view in the left navigation menu
  3. In the My Content tab, select the large red '+" Add Content Source icon

Image Modified
Select Add Content Source Icon

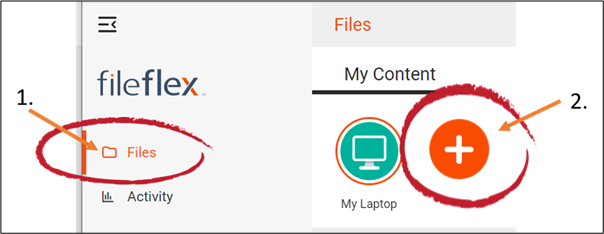
4. Select the ASUSTOR icon and run the setup wizard.

Note: You must be on the same network of the ASUSTOR NAS being added, via either LAN or Wi-Fi. After you have added the NAS as a content source, it can be accessed over the internet.

5. In the setup wizard, you will have the option to edit the following device settings

  • Network settings
  • Proxy settings to access the Internet
  • Anti-virus settings

To edit these or to define which antivirus software on the host machine will be used to scan

an

any files uploaded to it, please refer to the section 'Device Settings'.

Note: The antivirus software must already be installed and running with a valid license on the host machine

6. The activation page will now appear that will link your ASUSTOR NAS to your FileFlex account. You will need to enter the following credentials. 

(

Note: The user must be already set up as a user on the ASUSTOR NAS with credentials in place. Users are created by the administrator through ASUSTOR Control Center > click your NAS > Access Control > Local Users > Add.

)

Username - This is the username of the credentials you use to access the ASUSTOR NAS on the network.

Password - This is the password of the credentials you use to access the ASUSTOR NAS on the network.

Domain (Optional if not part of a domain) - If your NAS is on a company or corporate domain, you will need to enter the domain that your server belongs to. Leave this blank if you are not sure or contact your IT department for your domain name.

Activation Code - This code is entered automatically for you. For security reasons the code is time-limited and will time-out if not used shortly. If the code does time-out, you will need to start again at Step 1.

After you have entered your user credentials, click Activate.

Congratulations - You have connected FileFlex to your ASUSTOR NAS. You can now remotely access any of the storage that is attached to that NAS. To do so, using FileFlex, open the ASUSTOR repository that you just created, navigate to the files and folders that you wish to access, then save it to your Favorites directory for easy future access.
You should continue connecting FileFlex to all your repositories by selecting Add More. If finished, click Done.

Sv translation
languageja_JP

注: ASUSTOR NAS に接続するには、IT 部門の承認が必要です。 権限がある場合は、次の手順に従って ASUSTOR NAS に接続します。
ステップ 1: FileFlex コネクタを ASUSTOR NAS にインストールします。
(注: ユーザーは、資格情報を持った ASUSTOR のユーザーとしてセットアップ済みである必要があります。 ユーザーは、ASUSTOR コントロールセンターを介して管理者が作成します。[NAS] > [アクセス制御] > [ローカルユーザー] > [追加] の順にクリックします。インストールガイドを参照してください)。

  1. ASUSTOR コントロールセンターを介して ASUSTOR NAS にログインします。 (ASUSTOR NAS のセットアップと ASUSTOR コントロールセンターのインストールの詳細については、インストールガイドを参照してください)。
    1. コンピュータが ASUSTOR NAS と同じネットワークに接続され、インターネットにアクセスできることをご確認ください。
    2. ASUS Control Center ソフトウェアについては、こちらの ASUSTOR ウェブサイトからダウンロードしてください。
    3. ASUSTOR コントロールセンターを起動します。 ASUSTOR コントロールセンターは、ローカルネットワーク上で ASUSTOR NAS を見つけます。 NAS を選択してから、[ログイン] をクリックします。


ASUSTOR コントロールセンターを使用して NAS を見つけてログインします。

    1. 管理者のユーザー名とパスワードを入力してログインします。
  1. ASUSTOR NAS コントロールパネルで、[App Central] アイコンを選択します。


[App Central] を選択します。

  1. App Central が開いたら、左側のナビゲーションバーで [すべてのアプリ] を選択し、[FileFlexコネクタ] まで下にスクロールして、[インストール] をクリックします。


[すべてのアプリ] を選択し、[FileFlex コネクタ] までスクロールして、[インストール] をクリックします。

  1. App Central は、FileFlex コネクタをダウンロードして NAS にインストールします。 完了したら、インストールされ、オンに設定されていることを確認します。 左側のナビゲーションバーで [マイアプリ] を選択してから、[インストール済み] をクリックして、FileFlex コネクタが存在し、オンになっていることを確認します。


[マイアプリ] >> [インストール済み] の順番に選択し、FileFlex コネクタがインストールされて ON になっていることを確認します。
ステップ 2: FileFlex アカウントを ASUSTOR NAS にリンクします。
注: PC は同じネットワークを介して NAS に接続する必要があります。

  1. 次に、FileFlex アカウントを ASUSTOR NAS にリンクする必要があります。 FileFlex がすでにインストールされ、LAN または Wi-Fi を介して同じネットワーク経由で NAS に接続されている PC またはモバイルデバイスから、FileFlex を開きます。
  2. 左側のナビゲーションメニューで [ファイル] ビューを選択します
  3. [マイコンテンツ] タブで、大きな赤い「+」の [コンテンツソースの追加] アイコンを選択します


[コンテンツソースの追加] アイコンを選択します

  1. ASUSTOR アイコンを選択し、セットアップウィザードを実行します。注: LAN または Wi-F を介して、追加する ASUSTOR NAS と同じネットワーク上にいる必要があります。 NAS をコンテンツソースとして追加したら、インターネット経由でアクセスできます。

セットアップウィザードでは、次のデバイス設定を編集するオプションがあります

  • ネットワーク設定
  • インターネットにアクセスするためのプロキシ設定
  • アンチウイルス設定

これらを編集したり、アップロードされたファイルをスキャンするためにホストマシン上のどのウイルス対策ソフトウェアを使用するかを定義したりするには、「デバイス設定」セクションを参照してください。 注: ウイルス対策ソフトウェアがすでにインストールされ、ホストマシンに有効なライセンスで実行されている必要があります

  1. ASUSTOR NAS を FileFlex アカウントにリンクするアクティベーションページが表示されます。 次の資格情報を入力してください。  (注: ユーザーは、資格情報を持った ASUSTOR NAS のユーザーとしてセットアップ済みである必要があります。 ユーザーは、ASUSTOR コントロールセンターを介して管理者が作成します。 [NAS] > [アクセス制御] > [ローカルユーザー] > [追加] の順にクリックします。 ユーザー名 - これは、ネットワーク上の ASUSTOR NAS にアクセスするために使用する資格情報のユーザー名です。 パスワード - これは、ネットワーク上の ASUSTOR NAS にアクセスするために使用する資格情報のパスワードです。 ドメイン(ドメインの一部でない場合はオプション) - NAS が企業または企業ドメインにある場合、サーバーが属するドメインを入力する必要があります。 不明な場合はこのフィールドを空白のままにするか、IT 部門に連絡してドメイン名をご確認ください。 アクティベーションコード - このコードは自動的に入力されます。 セキュリティ上の理由から、コードは時間制限があり、すぐに使用しないとタイムアウトします。 コードがタイムアウトした場合は、ステップ 1 からやり直す必要があります。 ユーザーの資格情報を入力したら、[アクティブ化] をクリックします。

おめでとうございます。FileFlex を ASUSTOR NAS に接続しました。 これで、その NAS に接続されているストレージにリモートでアクセスできます。 これを行うには、FileFlex を使用して、作成したばかりの ASUSTOR リポジトリを開き、アクセスするファイルとフォルダに移動し、後で簡単にアクセスできるようにお気に入りディレクトリに保存します。
[さらに追加] を選択して、引き続き FileFlex をすべてのリポジトリに接続する必要があります。 完了したら、[完了] をクリックします。