Installing Docker| Note |
|---|
| title | Is Docker Already Configured? |
|---|
| If docker is already installed on your machine, you can skip this section |
| Note |
|---|
The following steps assume that you have SSH'ed into your virtual machine using putty, bash, etc. |
Ensure the system is updated: | Code Block |
|---|
sudo apt-get update
|
Install some packages needed to allow the use of APT over HTTPS: | Code Block |
|---|
sudo apt-get install apt-transport-https ca-certificates curl gnupg-agent software-properties-common
|
Add Docker's official GPG key: | Code Block |
|---|
curl -fsSL https://download.docker.com/linux/debian/gpg | sudo apt-key add -
|
Add the official docker APT repository (following the appropriate command for Debian, or for Ubuntu depending on your operating system): | Code Block |
|---|
| language | bash |
|---|
| title | DEBIAN - Adding the Docker Repository under Debian |
|---|
| sudo add-apt-repository "deb [arch=amd64] https://download.docker.com/linux/debian $(lsb_release -cs) stable"
|
or | Code Block |
|---|
| language | bash |
|---|
| title | UBUNTU - Adding the Docker Repository under Ubuntu |
|---|
| sudo add-apt-repository "deb [arch=amd64] https://download.docker.com/linux/ubuntu $(lsb_release -cs) stable" |
Update the package index again: | Code Block |
|---|
sudo apt-get update
|
Install the latest version of Docker Engine (community edition and containerd): | Code Block |
|---|
sudo apt-get install docker-ce docker-ce-cli containerd.io
|
Preparing a Deployment ConfigurationNow we must prepare our deployment specific configuration files. Start by downloading the FileFlex server image: Download the FileFlex docker image into the current user's home folder root: | Code Block |
|---|
cd ~
wget --http-user developer --http-password 2trEndY! https://res.fileflex.com/nec/docker/fileflex-v2.5.tar
|
| Note |
|---|
The method used for obtaining the image can be replaced by any method of your choosing, as long as a copy of the same image is used. This example proceeds with an HTTPS download as the chosen method. |
Once our docker image is downloaded, we will create a special folder inside our home that will contain all deployment configuration files which will be made available to the running Docker instance. Create a folder ~/config in the user's home folder that will contain all deployment configuration files
| Info |
|---|
| title | The Mounting of Deployment Config |
|---|
| The ~/config folder will be mounted by Docker, and will become available to the running instance under /opt/ffs/config. When setting path values in the configuration file (INI file), the code running within the container expects a path of /opt/ffs/config, despite it being available in the host machine as ~/config It's important to note that in this example we are placing the host's config folder under the user home folder (/home/dadmin/config), but this could be any other folder in the host system. Ensure that the INI file is adjusted to reflect this alternate location if you chose to use it. |
As mentioned in the note, ~/config will be available to the container code as /opt/ffs/config. We must now upload the certificate files, and the deployment info file (INI file) into this ~/config folder. | Note |
|---|
| This document does NOT specifically describe how to get these 3 files into the host machine. They can be copied through the local network, download by HTTP, or copied into the host machine by SCP. If the Docker host machine has been deployed in the cloud (for example in Azure), SCP is likely your best bet for getting the configuration files uploaded. An example is provided here whereby the files are copied from a remote machine into the host using SCP, but the specific method used must be adapted by the individuals following these steps. |
Preparing the CertificateCopy your domain's certificate files into our ~/config folder. This is an example only! | Code Block |
|---|
cd ~/config
scp some_user@some_domain.com:~/some_folder_with_certificates/STAR_fileflexdemo* . |
In our example, we have the following 3 certificate-related files in our ~/config folder: | Code Block |
|---|
-rw-r----- 1 dadmin dadmin 4123 Mar 26 22:01 STAR_fileflexdemo_com.ca-bundle
-rw-r----- 1 dadmin dadmin 2313 Mar 26 22:01 STAR_fileflexdemo_com.crt
-rw-r----- 1 dadmin dadmin 1704 Mar 26 22:01 STAR_fileflexdemo_com.key |
The deployment configuration file (INI file) expects a single certificate, so we must combine with bundle/intermediate with the primary certificate. An example for GoDaddy certificates is: | Code Block |
|---|
| language | bash |
|---|
| title | Combining GoDaddy Certificates |
|---|
| cat 524daaa823ca8e28.crt gd_bundle-g2-g1.crt >> cert_chain.crt |
In our case we have Sectigo certificates, so we issue the following command: | Code Block |
|---|
| language | bash |
|---|
| title | Combining Sectigo Certificates |
|---|
| cat STAR_fileflexdemo_com.crt STAR_fileflexdemo_com.ca-bundle >> cert_chain.crt |
This will result in a new file being created in our folder: | Code Block |
|---|
-rw-r--r-- 1 dadmin dadmin 6436 Mar 26 22:05 cert_chain.crt
-rw-r----- 1 dadmin dadmin 4123 Mar 26 22:01 STAR_fileflexdemo_com.ca-bundle
-rw-r----- 1 dadmin dadmin 2313 Mar 26 22:01 STAR_fileflexdemo_com.crt
-rw-r----- 1 dadmin dadmin 1704 Mar 26 22:01 STAR_fileflexdemo_com.key |
Preparing a Deployment Configuration FileWe must now prepare a deployment configuration file (setup.ini). This will typically be done on another machine and then copied into this host machine. In our example, the file is being prepared on the same machine that had the certificates from the prior step. In a working folder somewhere, create a file called "setup.ini" that will contain our deployment configuration information. Note that the paths contained in this file are interpreted as bring within the running container instance's path, not the host machine's path! | Code Block |
|---|
[default]
skip-page = [all]
admin-password = Q!w2e3r4
repo-select = None
firewall-enable = False
cert-pem = /opt/ffs/config/cert_chain.pem
cert-key = /opt/ffs/config/STAR_fileflexdemo_com.key
cert-password = randompassword
msp-id = 5e7bae3xxxxxxxxxxxxx67
msp-key = IBM34SOLELPXXXXXXXXXXXXXYWECF
hostname = docker.fileflexdemo.com
docker = True |
| Note |
|---|
Ensure that you customize the following fields in the setup.ini file: - The admin password should be set to a value you are comfortable with (for the user admin application)
- Your password must contain at least 8 characters, 1 capital, and one number
- The cert-pem filename (not path) should reflect your combined PEM file name. In our example it was cert_chain.crt.
- The cert-key filename should reflect your real key file name. In our example it was STAR_fileflexdemo_com.key
- The cert-password should be some random characters to protect your keystore. You are unlikely to need it again.
- Your hostname should be the hostname which you are deploying. docker.fileflexdemo.com in this example.
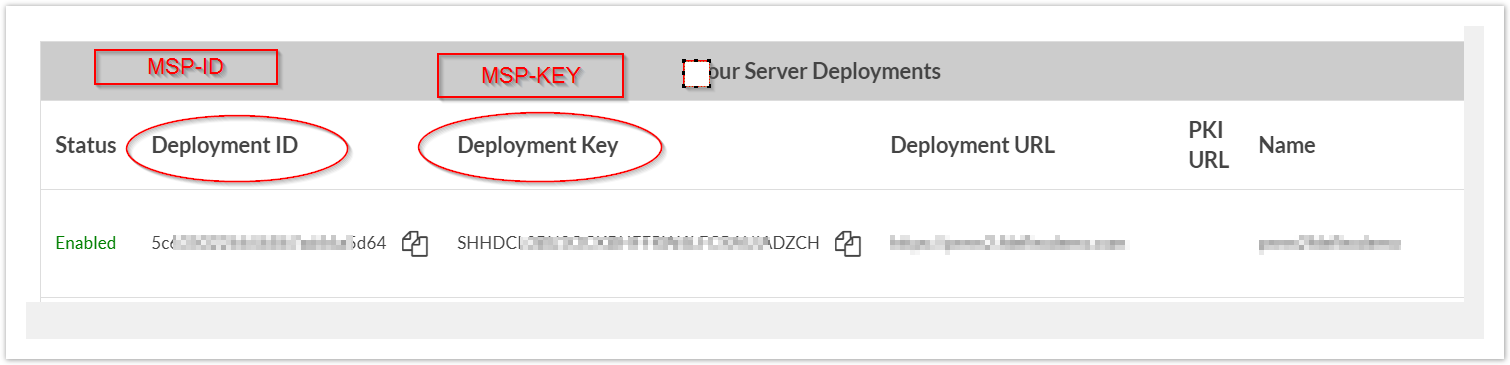
- Your msp-id should be the same as your "Deployment ID" and will have been provided to you in the Enterprise Portal. ( Also shown below in screenshot)
- your msp-key should be the same as your "Deployment Key" and will have been provided to you in the Enterprise Portal. ( Also shown below in screenshot)
The other fields should remain as they are in an automated Docker configuration. |
Let's copy the setup.ini file from the remote working machine into our host: | Code Block |
|---|
cd ~/config
scp some_user@some_domain.com:~/some_folder_with_config/setup.ini . |
Deploying our Docker ImageNow that we have a folder on the host machine containing the certificate files, and deployment configuration file (setup.ini), we're ready to load our image into docker and start things up. Import the FileFlex docker image: | Code Block |
|---|
cd ~
sudo docker load -i fileflex-v2.4.tar
|
This will take a moment. Once complete, check that the image is properly imported by running: | Code Block |
|---|
sudo docker images
|
... and you should see output similar to: | Code Block |
|---|
REPOSITORY          TAG                 IMAGE ID            CREATED             SIZE
fileflex            v2.4                ee4498eb1078        18 hours ago        2.02GB
|
Run the imported FileFlex container: | Warning |
|---|
| Be sure to modify the hostname parameter in the following command to match your deployment hostname! Also, check that your bind source folder points to your actual host configuration folder |
| Code Block |
|---|
sudo docker run -it -p 9443:9443 -p 443:443 -p 80:80 -p 4007:4007 -p 4010:4010 -p 4011:4011 -p 3310:3310 -d --name=fileflex --mount type=bind,source=/home/dadmin/config,target=/opt/ffs/config --hostname docker.fileflexdemo.com fileflex:v2.4 |
Validate that the container is running: ... you should see output similar to: | Code Block |
|---|
CONTAINER ID        IMAGE               COMMAND                  CREATED             STATUS              PORTS                                                                                                                                                 NAMES
4e0ad8deb93c fileflex:v2.4 "/usr/bin/supervisord" 22 seconds ago Up 16 seconds 0.0.0.0:80->80/tcp, 0.0.0.0:443->443/tcp, 0.0.0.0:4007->4007/tcp, 0.0.0.0:4010-4011->4010-4011/tcp, 0.0.0.0:9443->9443/tcp, 0.0.0.0:32768->3310/tcp fileflex |
| Note |
|---|
It can take a few minutes for the instance to finish booting, even after the docker command returns. |
Congratulations, FileFlex is now running. You should be able to access server admin by opening a browser to: | Code Block |
|---|
https://docker.fileflexdemo.com:9443 |
Next StepsLogging in to Server AdminSome configuration is necessary to obtain a properly running FileFlex server instance. The first step is to log in to Server Admin over port 9443. Open a browser at your domain URL (docker.fileflexdemo.com is an example only) | Code Block |
|---|
https://docker.fileflexdemo.com:9443 |
When prompted for login credentials, use the following: - Username: sadmin
- Password: Q!w2e3r4
Once logged in you will see a screen similar to the following: 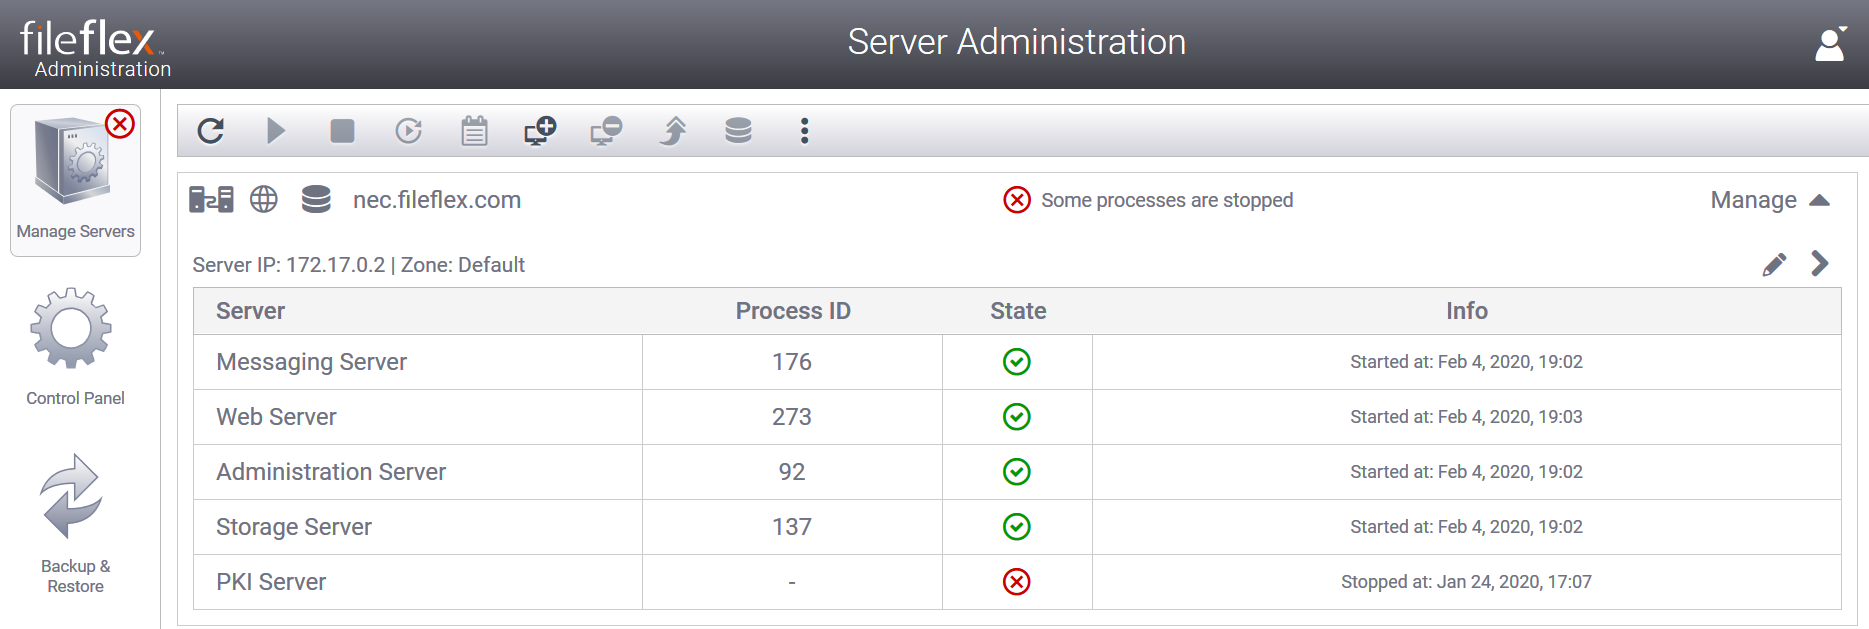
Configuring a User Administration AccountYou will need a user administration account in order to configure user accounts. Under Control Panel, click on "User Administration": 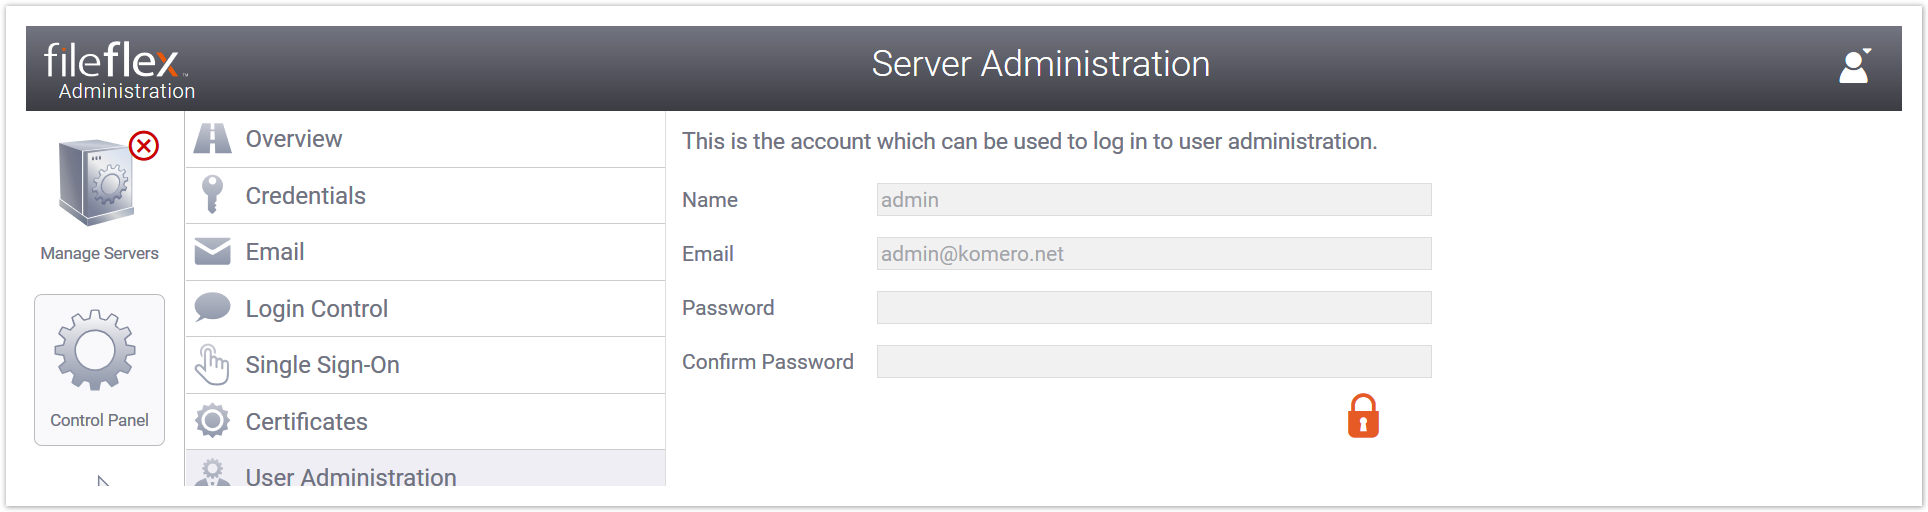
A prior account will be shown, but the password isn't known to you, so create a new one. Click the lock symbol to edit the values: 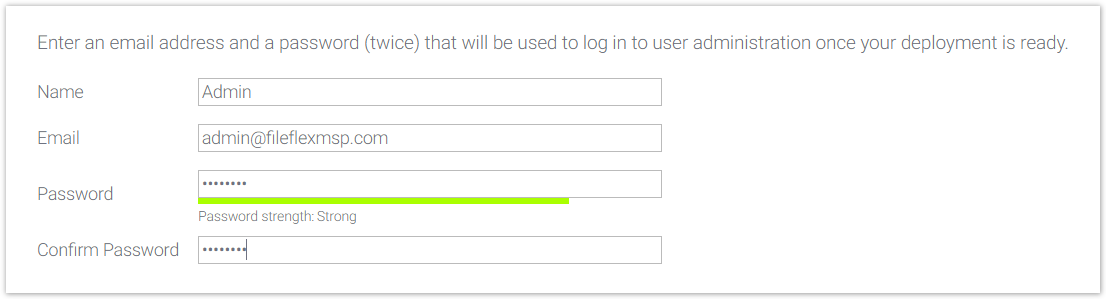
Click Apply when you're satisfied. Accessing User AdministrationUser Administration is accessed from the primary FileFlex login, which should now be accessible at the URL you provided earlier (docker.fileflexdemo.com in this example). Open your browser to that URL over HTTPS: | Code Block |
|---|
https://docker.fileflexdemo.com |
... you will be presented with the FileFlex login page: 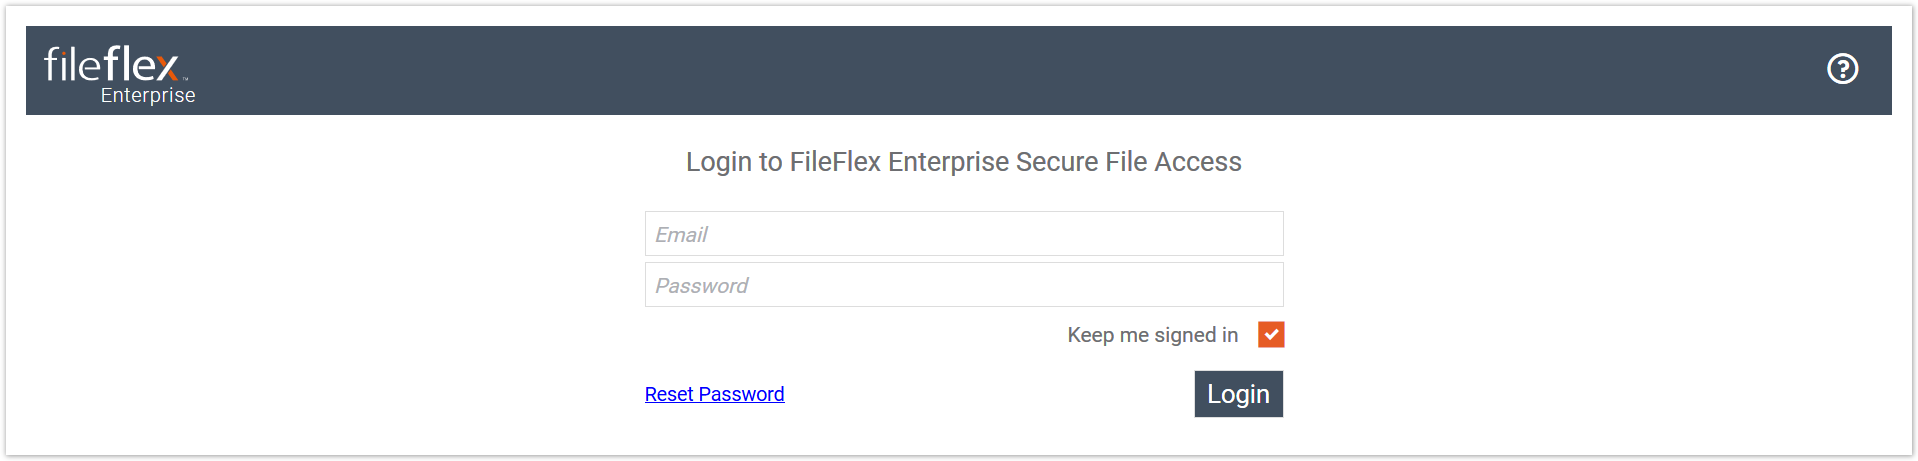
Enter the user admin credentials you previously created, and click login. You should then be presented with the "User Administration" user interface: 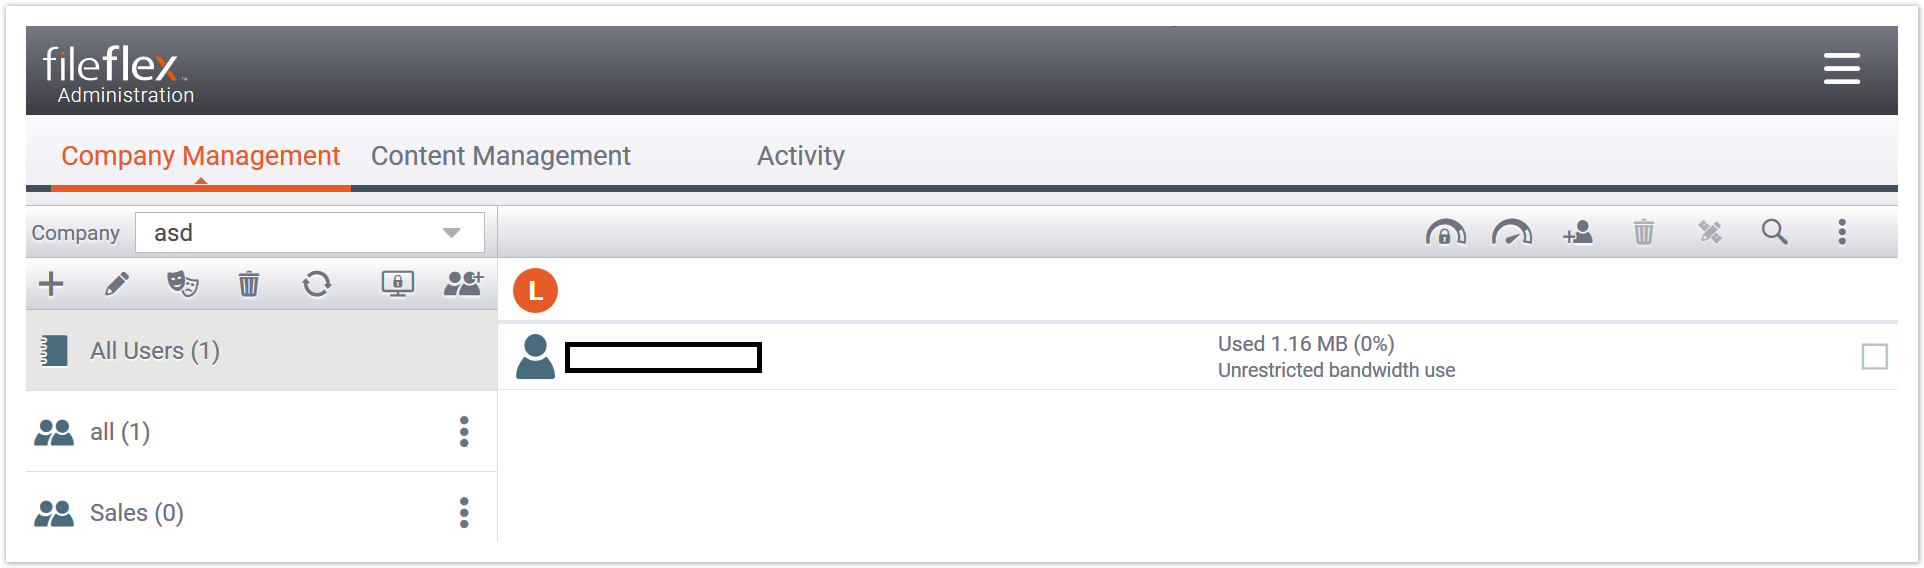
Primary configuration of FileFlex Enterprise is now complete. |