Page tree

Versions Compared

Key

  • This line was added.
  • This line was removed.
  • Formatting was changed.
Comment: Content imported from a Scroll Translations translation file.
Sv translation
languageen

Note: Each user that you import will consume a paid. It will only import if the number of users is less than the number of unused paid seats available. For example, if you have paid for 50 seats and import 70 users, it will not import any users. The number of imported users should always be less than number of unused seats available.  

  1. Prepare a comma delimited csv file of the users to import. The file only needs two fields per user - the user's name (full name) and the user's email.
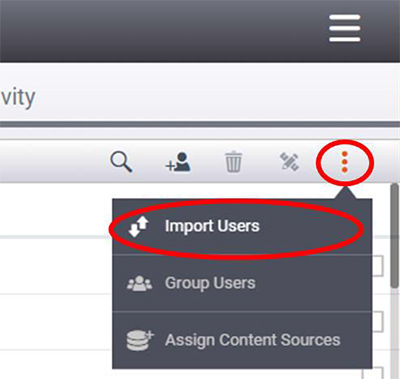
  2. In the Company Management tab, in the dropdown from the right side activity menu (3 dots), select Import Users.


Prepare csv file, then Import Users

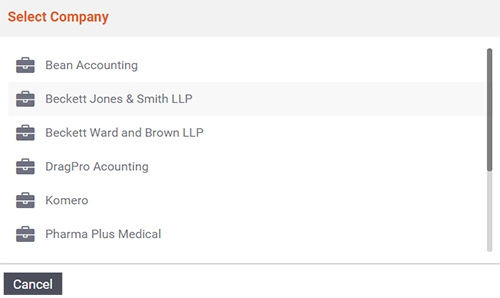
  1. Select the company that your are importing the user to. Then click OK.


Select Company

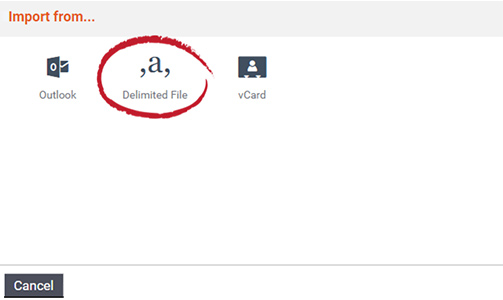
  1. Select Delimited File (for detailed instructions on importing from Outlook, Google Mail, Linked In and Yahoo Mail User Management - Importing Users


Select Delimited File

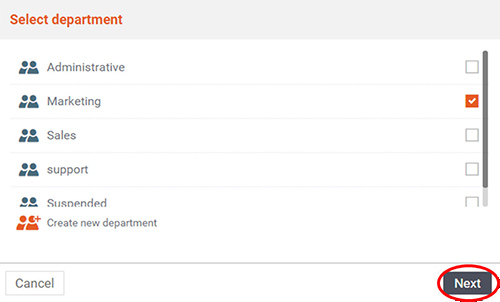
  1. Select a department to add the users to and click Next. a. Tip: If you are importing a high number of users who do not all belong to the same department, you can create a temporary department to add the new users to and sort them later. See Edit/Manage a User for more information on how to do so.


Select Department

  1. When you import users, an auto generated email will be sent to them with their FileFlex user name and password and a link to their onboarding instructions.

Note: Each user that you import will consume a paid FileFlex seat that you have purchased. Do not import users for which you do not want to purchase a FileFlex account.

Format of The Delimited File 

If you are manually creating a comma limited file, you can refer below for a sample file and formats.

You can also provide names in First, Middle and Last name format. 


Sv translation
languageja_JP

注: インポートする各ユーザーは有料です。ユーザー数が、利用できる未使用の有料シートの数より少ない場合にのみインポートされます。例えば、50 シート分を支払い、70 ユーザーをインポートする場合、ユーザーを誰もインポートできません。インポートするユーザーの数は、常に利用できる未使用のシートの数よりも少なくする必要があります。  

  1. インポートするユーザーのカンマ区切りの csv ファイルを準備します。このファイルには、ユーザーごとに 2 つのフィールド (ユーザー名 (フルネーム) とユーザーの E メールアドレス) のみが必要です。
  2. [会社の管理] タブの右側のアクティビティメニュー (3 つのドット) からのプルダウンで、[ユーザーのインポート] を選択します。


csv ファイルを準備してから、[ユーザーのインポート] をクリックします

  1. ユーザーのインポート先の会社を選択します。次に、[OK] をクリックします。


会社の選択

  1. [区切りファイル] を選択します (Outlook、Google Mail、LinkedIn、Yahoo Mail からのインポートの詳細な手順については、ユーザー管理 - ユーザーのインポートを参照してください)。


[区切りファイル] を選択します

  1. ユーザーを追加する部門を選択して、[次へ] をクリックします。 a. ヒント: 全員が同じ部門に属していない多数のユーザーをインポートする場合は、一時的な部門を作成して、新しいユーザーを追加し、後で並べ替えることができます。これを行う方法の詳細については、「ユーザーの編集/管理」を参照してください。


部門の選択

  1. ユーザーをインポートすると、自動生成された E メールが、FileFlex ユーザー名とパスワード、およびオンボーディング手順へのリンクとともにそのユーザーに送信されます。

注: インポートするユーザーごとに、購入した有料の FileFlex シートを消費します。FileFlex アカウントを購入したくないユーザーをインポートしないでください。

区切りファイルの形式 

カンマ区切りファイルを手動で作成する場合は、以下のサンプルファイルと形式を参照してください。

名、ミドルネーム、姓の順に名前を指定することもできます。