...
| Sv translation | |||||||||||||||||||||||||||||||||||||||||||||||||||||||||||||||||||||||||||||
|---|---|---|---|---|---|---|---|---|---|---|---|---|---|---|---|---|---|---|---|---|---|---|---|---|---|---|---|---|---|---|---|---|---|---|---|---|---|---|---|---|---|---|---|---|---|---|---|---|---|---|---|---|---|---|---|---|---|---|---|---|---|---|---|---|---|---|---|---|---|---|---|---|---|---|---|---|---|
| |||||||||||||||||||||||||||||||||||||||||||||||||||||||||||||||||||||||||||||
Components of FileFlex Enterprise PlatformFileFlex enterprise platform consists of 3 main components.
IntroductionFileFlex enterprise server can be deployed as a cluster with a minimum requirement of 4 virtual machines. This allows companies with a high volume of users accessing the system to plan and deploy a highly available FileFlex solution. ScopeThe scope of this document is to make the enterprise server component of the platform highly available. Planning & RequirementsThe deployment of the cluster requires some preparation work. Listed below are some of the key requirements; actual provisioning of these required items will happen in sequence during the cluster deployment.
Note on Installation StepsOnce you have the domain names planned you can go ahead with the next installation steps. We will follow a logical sequence of steps but based on Cloud Service Providers (CSPs) like Azure, AWS Google Cloud etc. the Steps Sequence will have additional steps in their relevant sections.
Installing High Availability cluster on AWSLogin to AWS Portal at https://console.aws.amazon.com/ STEP: Link AWS AccountNOTE: if you have not linked your AWS account id in the FileFlex enterprise portal already then do that now. This will allow you to see FileFlex VM image in Amazon Machine Image(AMI) listing.
STEP: Verify and Enable DNS Attributes
STEP: Create IPsCreate 4 (FOUR) separate Elastic IPs ("Network & Security" -> "Elastic IPs" -> "Allocate Elastic IP address")
STEP: Create Security GroupNavigate to "Security Groups" -> "Create security group"
STEP: Spool up VM instancesCreate a VM from the latest image ("AMIs" -> "Images"). Find the FileFlex imageIf you followed STEP 6.1 to link AWS id in FileFlex Enterprise Partner Portal then you will find the FileFlex image by selecting Private Images in the filter
In order to start the process, select the image and click "Launch" Deploy the VMChoose an instance type with at least 4GiB of Memory with 2 cores this is the baseline:
Choose the number of instancesType in 4 to provision the number of instances we need.
Click all the way to the Configure Security Group Assign security groupNavigate to the "6. Configure Security Group" tab,
Create a key pair to access server instancesYou will be presented with the key pair specification dialogue next
Click the blue "View Instances" button at the bottom right. You will see a list of your running instance, including the newly spooled up instance
STEP: Assign Elastic IPs to Instances
STEP: Copy the private IPs
STEP: Create Hosted ZonesRoute 53 is Amazon's DNS service that will be used to route traffic internally.
STEP: Create PTR Record (reverse zones) Per InstanceFrom the "Hosted zone details" select "Create record":
From the "Quick create record" window add a record for each of the nodes by using the private IPs which were copied above. Fill the details as follows: 4. Click create record
5. Add a PTR record for each of the machines (total of 4) In the end, the hosted zone should look similar to the following: Here we created one PTR record per machine
STEP: Create Forward Zones per Instance
STEP: Setup External Domain DNSDepending on where you are hosting you existing domain, it is time to configure A records pointing to external IPs assigned to the Instances.
For example the A records for our sample domain setup looks like this on Network Solutions DNS manager:
STEP: Start installing Primary FileFlex ServerConnect with ssh to each of the machines and run the setup process. Login using the default password (you will be prompted to change this later in the setup) Username: sadmin Password: Q!w2e3r4 As soon as you log in to the VM you will be presented with the following screen.
STEP 1 Choose the language of choice
STEP 2 Choose "Primary or single machine"
STEP 3 Choose a password for sadmin account
STEP 4 SKIP this step
STEP 5 Enter the Primary domain that will be used to access the FileFlex server by end-users
STEP 6 WAIT!!!!!! this will take some time.....
PRIMARY Server is ready to be configured. Click Reboot
STEP: Start installing Secondary FileFlex ServerSSH into the Secondary Machines in sequence to start adding them to the cluster i.e. VM#2 then #3 and then #4 Login using the default password (you will be prompted to change this later in the setup) Username: sadmin Password: Q!w2e3r4
You will see the same initial screen on the first access STEP 1 Choose language of choice
STEP 2 Choose Secondary machine in a cluster option
STEP 3 Choose a password for sadmin
STEP 4 SKIP this step
STEP 5 Enter the proper Secondary domain for the designated machine here
STEP 6 Now the VM is ready to be added to the Cluster, its time to open your web browser to access the Primary Machine
NOTE: IF this happens and the timer expires after 30 minutes then run the following command
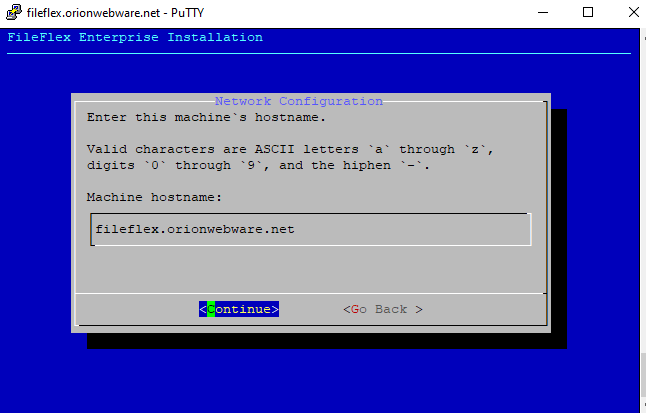
STEP: Start configuring the FileFlex Server ClusterSTEP 1 Now you can access this machine using the hostname you have configured for the primary server at: EXAMPLE: https://fileflex.orionwebware.net:9443
STEP 2 Login using the sadmin username and password that you used for the primary machine.
STEP 3 Prompt to enter the FileFlex deployment ID and FileFlex deployment keys and click Verify
STEP 4 Choose "Configure a high-availability cluster" option and click next
STEP 5 Setup your Global Admin credentials for Policy and Users management console
STEP 6 Almost ready to start adding machines.
STEP 7 Click OK to start
The setup will take few minutes to configure the Primary Server
STEP 8 When prompted enter the hostname of the machine awaiting addition to the cluster and sadmin password for that machine
NOTE: Primary Server will setup trust with secondary servers and automatically assign their roles in the cluster.
NOTE: the screen will update on the secondary machine as follows
STEP 9 And the Primary server keeps the setup going awaiting the next secondary servers
STEP 10 Follow the ok and Yes prompts
STEP 11 Once the setup completes. Some services may be stopped. Simply select them and click start icon to start them.
STEP 12 Finalize the setup in the control panel
|


| Sv translation | |||||||||||||||||||||||||||||||||||||||||||||||||||||||||||||||||||||||||||||
|---|---|---|---|---|---|---|---|---|---|---|---|---|---|---|---|---|---|---|---|---|---|---|---|---|---|---|---|---|---|---|---|---|---|---|---|---|---|---|---|---|---|---|---|---|---|---|---|---|---|---|---|---|---|---|---|---|---|---|---|---|---|---|---|---|---|---|---|---|---|---|---|---|---|---|---|---|---|
| |||||||||||||||||||||||||||||||||||||||||||||||||||||||||||||||||||||||||||||
Componentes de la plataforma FileFlex EnterpriseLa plataforma de FileFlex Enterprise consta de 3 componentes principales.
IntroducciónEl servidor de FileFlex Enterprise puede implementarse como un clúster con un requisito mínimo de 4 máquinas virtuales. Esto permite a las empresas con gran volumen de usuarios que acceden al sistema planificar e implementar una solución FileFlex de gran disponibilidad. AlcanceEl alcance de este documento es hacer que el componente de servidor Enterpise de la plataforma tenga gran disponibilidad. Planificación y requisitosLa implementación del clúster requiere trabajo de preparación. A continuación se enumeran algunos de los requisitos clave; el suministro real de estos elementos necesarios se producirá en secuencia durante la implementación del clúster.
Nota sobre los pasos de instalaciónCuando tenga los nombres de dominio planificados puede proceder con los siguientes pasos de instalación. Seguiremos una secuencia lógica de pasos pero, con base en los proveedores de servicios en la nube (CSP) como Azure, AWS, Google Cloud, etc., la secuencia de pasos tendrá pasos adicionales en las secciones relevantes.
Instalación del clúster de gran disponibilidad en AWSInicie sesión en el portal de AWS en https://console.aws.amazon.com/ PASO: Vincular la cuenta de AWSNOTA: si aún no ha vinculado la ID de su cuenta de AWS en el portal de FileFlex Enterprise, hágalo ahora. Esto le permitirá ver la imagen de la VM de FileFlex en la lista de imágenes de máquinas de Amazon (AMI).
PASO: Comprobar y habilitar los atributos DNS
PASO: Crear las IPCree 4 (CUATRO) IP elásticas separadas ("Red y seguridad" -> "IP elásticas" -> "Asignar dirección IP elástica")
PASO: Crear grupo de seguridadNavegue hasta "Grupos de seguridad" -> "Crear grupo de seguridad"
PASO: Crear instancias de VMCree una VM a partir de la última imagen ("AMIs" -> "Imágenes"). Encontrar la imagen de FileFlexSi realizó el PASO 6.1 para vincular la ID de AWS en el portal de socios de FileFlex Enterprise, encontrará la imagen de FileFlex si selecciona Imágenes privadas en el filtro.
Para comenzar el proceso, seleccione la imagen y haga clic en "Lanzar". Implementar la VMEscoja un tipo de instancia con por lo menos 4 GB de memoria con 2 núcleos, esta es la base:
Escoger el número de instanciasEscriba 4 para suministrar el número de instancias que necesitamos.
Haga clic hasta Configurar grupo de seguridad. Asignar grupo de seguridadNavegue hasta la pestaña "6. Configurar grupo de seguridad".
Crear un par de claves para acceder a las instancias del servidorA continuación, se mostrará el cuadro de diálogo de especificación de par de claves.
Haga clic en el botón azul "Ver instancias" en la parte inferior derecha. Verá una lista de instancias en ejecución, incluida la instancia recientemente creada.
PASO: Asignar las IP elásticas a las instancias
PASO: Copiar las IP privadas
PASO: Crear zonas alojadasRoute 53 es el servicio DNS de Amazon que se utilizará para enrutar el tráfico internamente.
PASO: Crear un registro PTR (zonas inversas) por instanciaEn "Detalles de zona alojada", seleccione "Crear registro".
En la ventana "Creación rápida de registro", añada un registro para cada uno de los nodos con las IP privadas que se copiaron anteriormente. Complete la información de la siguiente manera: 4. Haga clic en Crear registro.
5. Añada un registro PTR para cada una de las máquinas (total de 4). Por último, la zona alojada debe ser similar a lo siguiente: Aquí hemos creado un registro PTR por máquina.
PASO: Crear zonas forward por instancia
PASO: Configurar DNS de dominio externoDependiendo de dónde esté alojando el dominio existente, es hora de configurar registros A que señalen a las IP externas asignadas a las instancias.
Por ejemplo, los registros A de la configuración de dominio de ejemplo tienen esta apariencia en el administrador de DNS de Network Solutions.
PASO: Comenzar la instalación del servidor principal de FileFlexConéctese mediante SSH a cada una de las máquinas y ejecute el proceso de configuración. Inicie sesión con la contraseña predeterminada (se le solicitará que la cambie más adelante en la configuración). Nombre de usuario: sadmin Contraseña: Q!w2e3r4 Después de iniciar sesión en la VM aparecerá la siguiente pantalla.
PASO 1 - Escoja el idioma.
PASO 2 - Escoja "Máquina principal o única".
PASO 3 - Escoja una contraseña para la cuenta de sadmin.
PASO 4 - OMITA este paso.
PASO 5 - Introduzca el dominio principal que los usuarios finales usarán para acceder al servidor de FileFlex.
PASO 6 - ¡¡ESPERE!! Esto tardará un tiempo...
El servidor PRINCIPAL está listo para la configuración. Haga clic en Reiniciar
PASO: Comenzar la instalación del servidor secundario de FileFlexConéctese mediante SSH en las máquinas secundarias en secuencia para comenzar a añadirlas al clúster, es decir, VM n.º 2, después la n.º 3 y, a continuación, la n.º 4. Inicie sesión con la contraseña predeterminada (se le solicitará que la cambie más adelante en la configuración). Nombre de usuario: sadmin Contraseña: Q!w2e3r4
Verá la misma pantalla inicial en el primer acceso. PASO 1 - Escoja el idioma.
PASO 2 - Seleccione la opción Máquina secundaria en el clúster.
PASO 3 - Escoja una contraseña para sadmin.
PASO 4 - OMITA este paso.
PASO 5 - Introduzca aquí el dominio secundario correcto para la máquina designada.
PASO 6 - Ahora la VM está lista para añadirla al clúster; esta vez, abra el navegador web para acceder a la máquina principal.
NOTA: SI esto ocurre y el temporizador caduca después de 30 minutos, ejecute el siguiente comando
PASO: Comenzar a configurar el clúster del servidor FileFlexPASO 1 - Ahora puede acceder a esta máquina con el nombre de host que ha configurado para el servidor principal en: EJEMPLO: https://fileflex.orionwebware.net:9443
PASO 2 - Inicie sesión con el nombre de usuario y contraseña de sadmin que usó en la máquina principal.
PASO 3 - Introduzca la ID y las claves de implementación de FileFlex y haga clic en Verificar.
PASO 4 Seleccione la opción "Configurar un clúster de gran disponibilidad" y haga clic en siguiente.
PASO 5 - Configure las credenciales de administración global para la consola de administración de políticas y usuarios.
PASO 6 - Casi está listo para comenzar a añadir las máquinas.
PASO 7 - Haga clic en Aceptar para comenzar.
Esta instalación tardará algunos minutos en configurar el servidor principal.
PASO 8 - Cuando se le solicite, introduzca el nombre de host de la máquina que está esperando añadirse al clúster y la contraseña sadmin de dicha máquina.
NOTA: El servidor principal configurará confianza con los servidores secundarios y les asignará automáticamente sus roles en el clúster.
NOTA: la pantalla se actualizará en la máquina secundaria de la siguiente manera.
PASO 9 - El servidor principal continúa con la configuración en espera de los siguientes servidores secundarios.
PASO 10 - Siga las opciones Aceptar y Sí.
PASO 11 - Cuando finalice la configuración algunos servicios pueden haberse detenido. Simplemente selecciónelos y haga clic en el icono inicio para iniciarlos.
PASO 12 - Finalice la configuración en el panel de control.
|